Everything you need to
get the most out of HighwayRadar.
A plain-English manual for setting up and using the app. New to the app? Start at the top. Looking for one answer? Jump straight to it below (or use ctrl + f).
01Getting started
HighwayRadar pulls every kind of speed-enforcement warning onto one screen: crowd-sourced police reports, cameras, enforcement aircraft, and your own radar detector. Here's how to get started and make sense of everything.
First-time setup
- Download & open the app. HighwayRadar runs on iPhone (iOS 16 and later), iPad, and in your car with CarPlay.
- Allow location, bluetooth, and notification permissions. The app needs your location to show alerts near you and to know your speed and the road you're on. For the app to keep warning you with the screen off or while using maps, choose “Allow While Using App”.
- Walk through the welcome screens. You can tap Skip at any time.
- Start driving. The initial settings are intended to work for the widest audience, and alerts appear automatically as you approach them. Everything else below is optional fine-tuning.
HighwayRadar gives you a few free sessions to try everything out. After that, an active subscription is required to keep using it because it costs me real money on every use. Use those first sessions to set things up and see how it all works before you decide.
Why does the app need “When In Use” / background location? Learn more
iPhone apps can be limited to only running while they're on screen. Because you'll often have your phone locked or be looking at a maps app while driving, granting background location lets HighwayRadar keep watching the road ahead and warn you even when it isn't the app you're looking at. If you'd rather not, the app still works fully whenever it's open on screen.
Saving battery: Power Save mode
Because HighwayRadar watches your location continuously, it includes a Power Save mode that shuts the app down to protect your battery when you're not actively driving. When it's on, you'll see a “Power Save Mode Enabled” screen. Tap Resume and you're back to full operation.
You can have it turn on by itself in two ways. Both are off unless you switch them on:
- Auto Power Save (Settings → Advanced): Switches to Power Save automatically after the app has sat in the background for 10 minutes.
- Auto Power Save on detector disconnect (Settings → Radar Detector): Switches to Power Save when your radar detector disconnects.
What exactly does Power Save mode do? Learn more
In Power Save mode the app pauses the largest power draws, like location and aircraft tracking, map rendering, and bluetooth connection monitoring. Your settings stay put and the app isn't closed, it's just resting and won't deliver alerts until you bring it back.
It stays in Power Save until you resume it. The timer behind Auto Power Save is a fixed 10 minutes in the background.
02The main screen
The main screen is a live map of the road and threats around you, designed to be understood at a glance while driving.
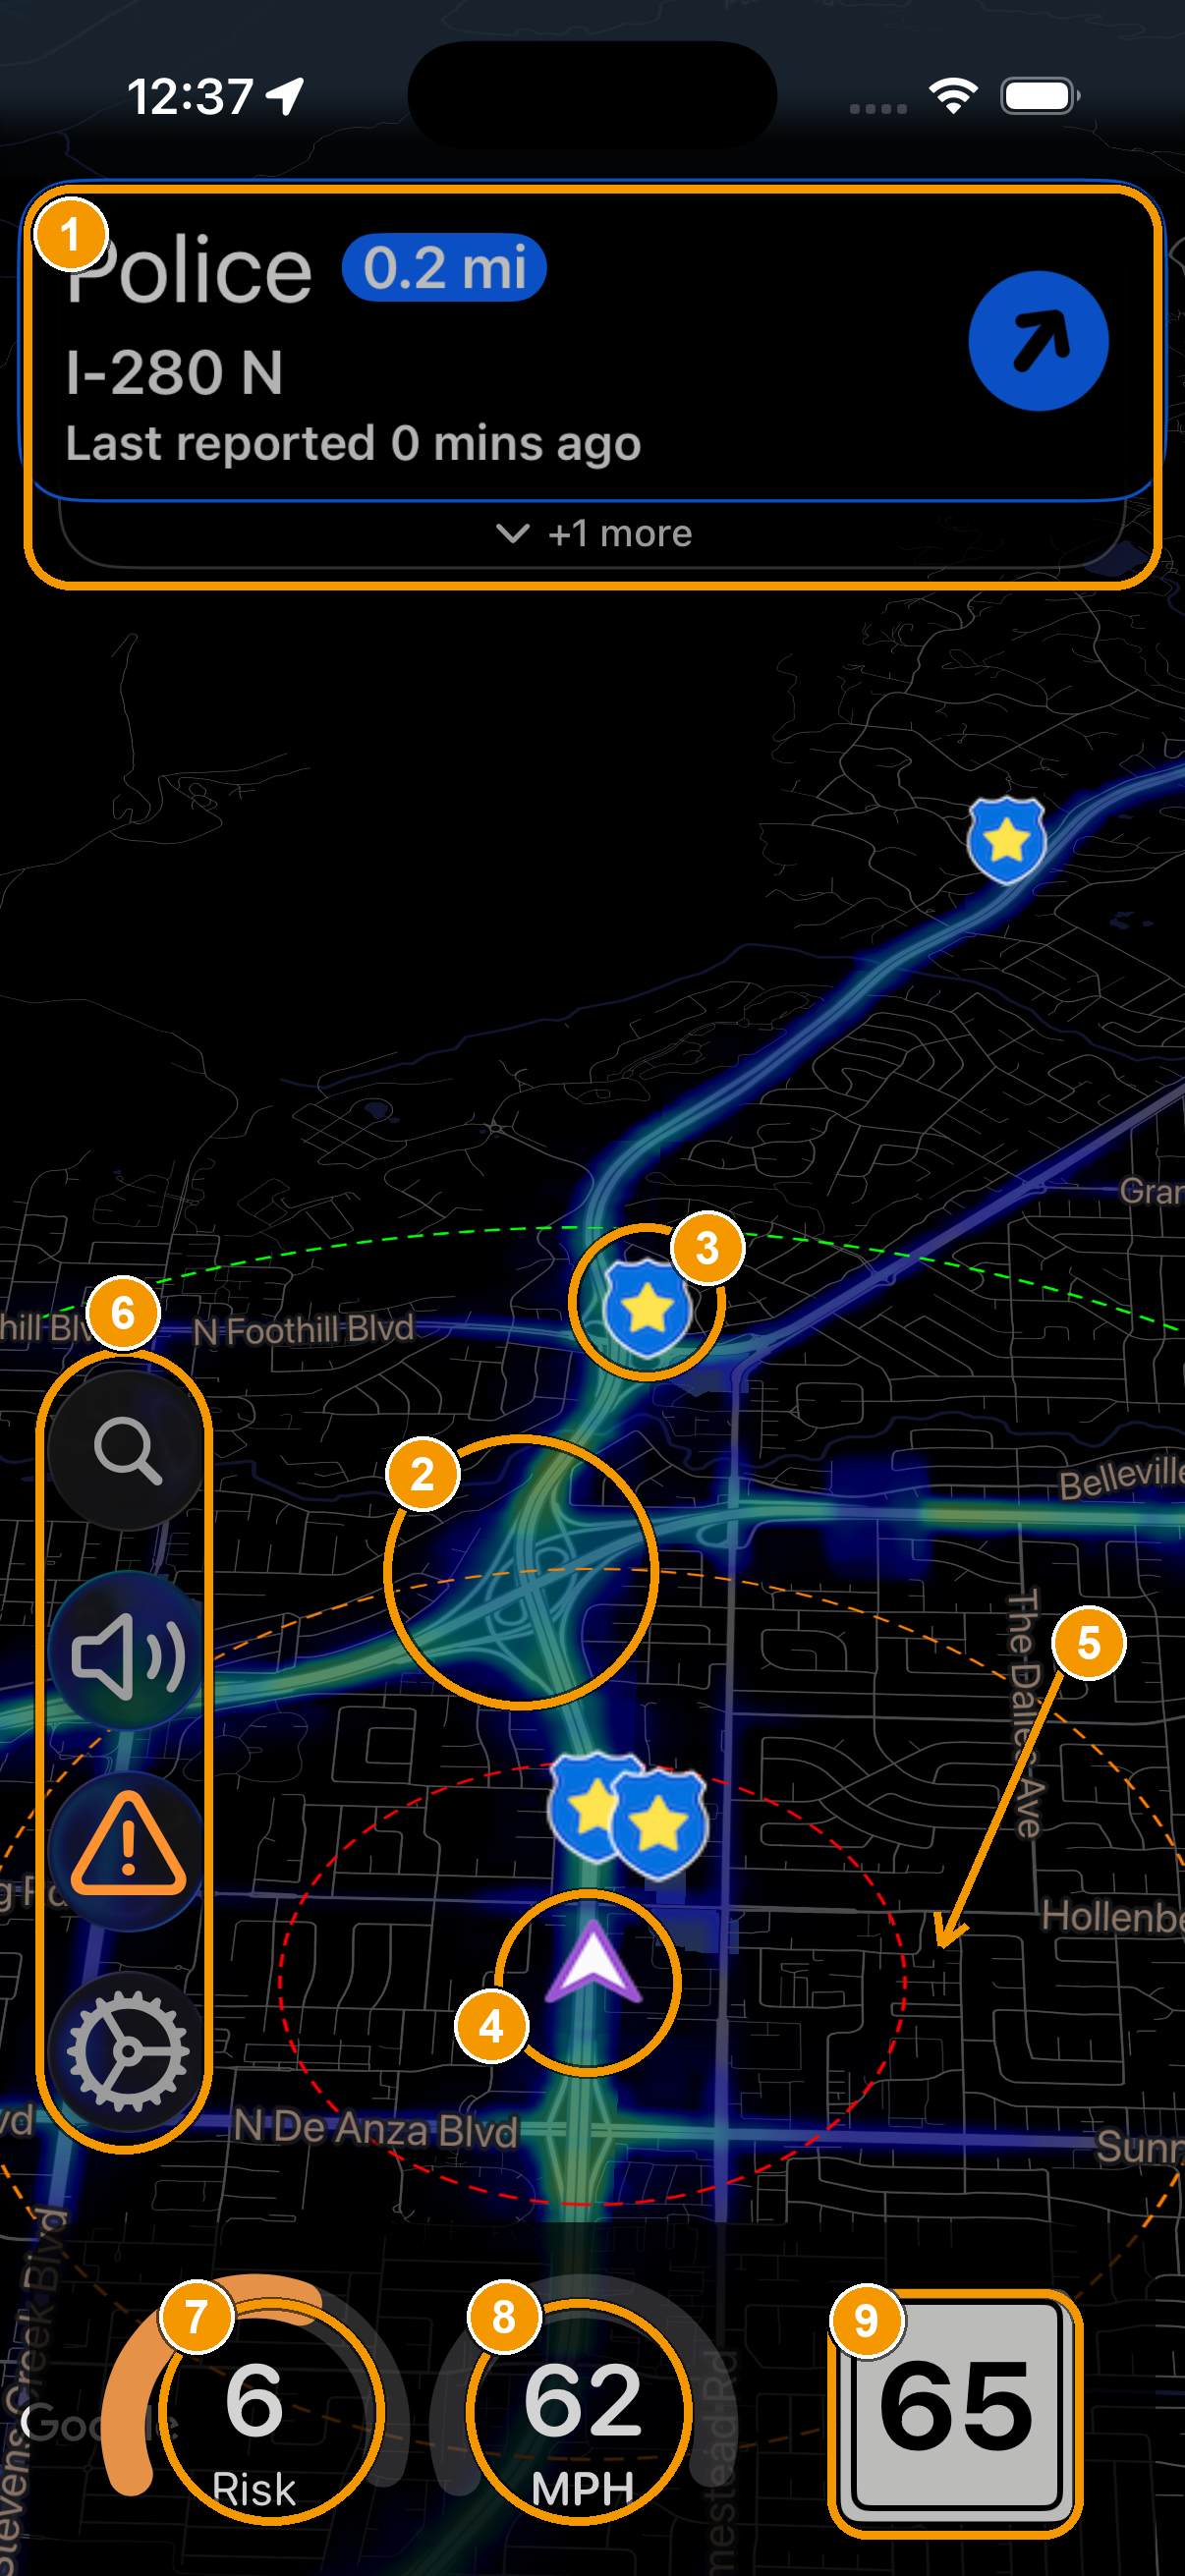
- Alert banner. Police, camera, aircraft, and radar/laser warnings slide in here as you approach, showing details like threat type, distance, road name, and how long ago it was reported. Navigation directions appear here too. Tap the banner to focus the map on the alert.
- Heat map. The colored overlay marking where enforcement has historically clustered. Warmer areas see more activity (§4).
- Report markers. Shield icons show police sightings reported by nearby drivers. They glow by age (red = new, green = old) and group together when several are close.
- Your location & heading. The arrow is you, pointing the direction you're travelling.
- Range rings. Distance circles so you can judge how far away a marker is. Toggle them, and their labels, in Map settings (§7).
- Button stack. Top to bottom: search for a destination, app-wide mute, report a police sighting, and open Settings. Not pictured: bluetooth indicator and recenter button.
- Risk score. A live reading of how likely enforcement is in your hyper-local vicinity right now. Tap it to see the details or change the scale (§4).
- Your speed. Your current speed, in MPH or km/h. The gauge shows progress against your personal limit. Tap it to change.
- Speed limit. The posted limit for the road you're on.
Tap to adjust, on the spot
Many things on the main screen are tappable shortcuts. Tap the risk or speed gauges at the bottom to jump straight to their settings. Tap the alert icons to show more information. Tap the bluetooth indicator to open the connected device settings.
Two quick comfort settings: Let the theme follow your local sunrise/sunset, and turn on speed-sensitive zoom (enabled by default) so the map zooms out as you speed up and in as you slow down.
Live traffic
HighwayRadar can overlay real-time traffic (provided by Google Maps) on the map so you can see slowdowns ahead. Turn it on with Settings → Map → “Show traffic on map.” One thing to know: the traffic overlay and the heat map use similar coloring, so running both at once can get hard to read. I recommend picking one or the other, or using a heat map theme like "Pink" that doesn't overlap much with traffic indicator colors.
03Alerts & reporting
What you'll be warned about
- Police: Live sightings reported by other drivers, with distance, age, and even speed limit at their location (in "Current Street" alert mode).
- Cameras: Fixed speed cameras, red-light cameras, and license-plate (ALPR) cameras from verified databases (see section 05).
- Aircraft: Planes and helicopters used for speed enforcement (see section 06).
- Radar / laser: If you pair a hardware radar detector, its signals show up here too (see section 08).
Reporting a police sighting
When you pass an officer, tap the report button and confirm a few details. The app may also prompt you to confirm a report at the right moment so you don't have to reach for the screen.
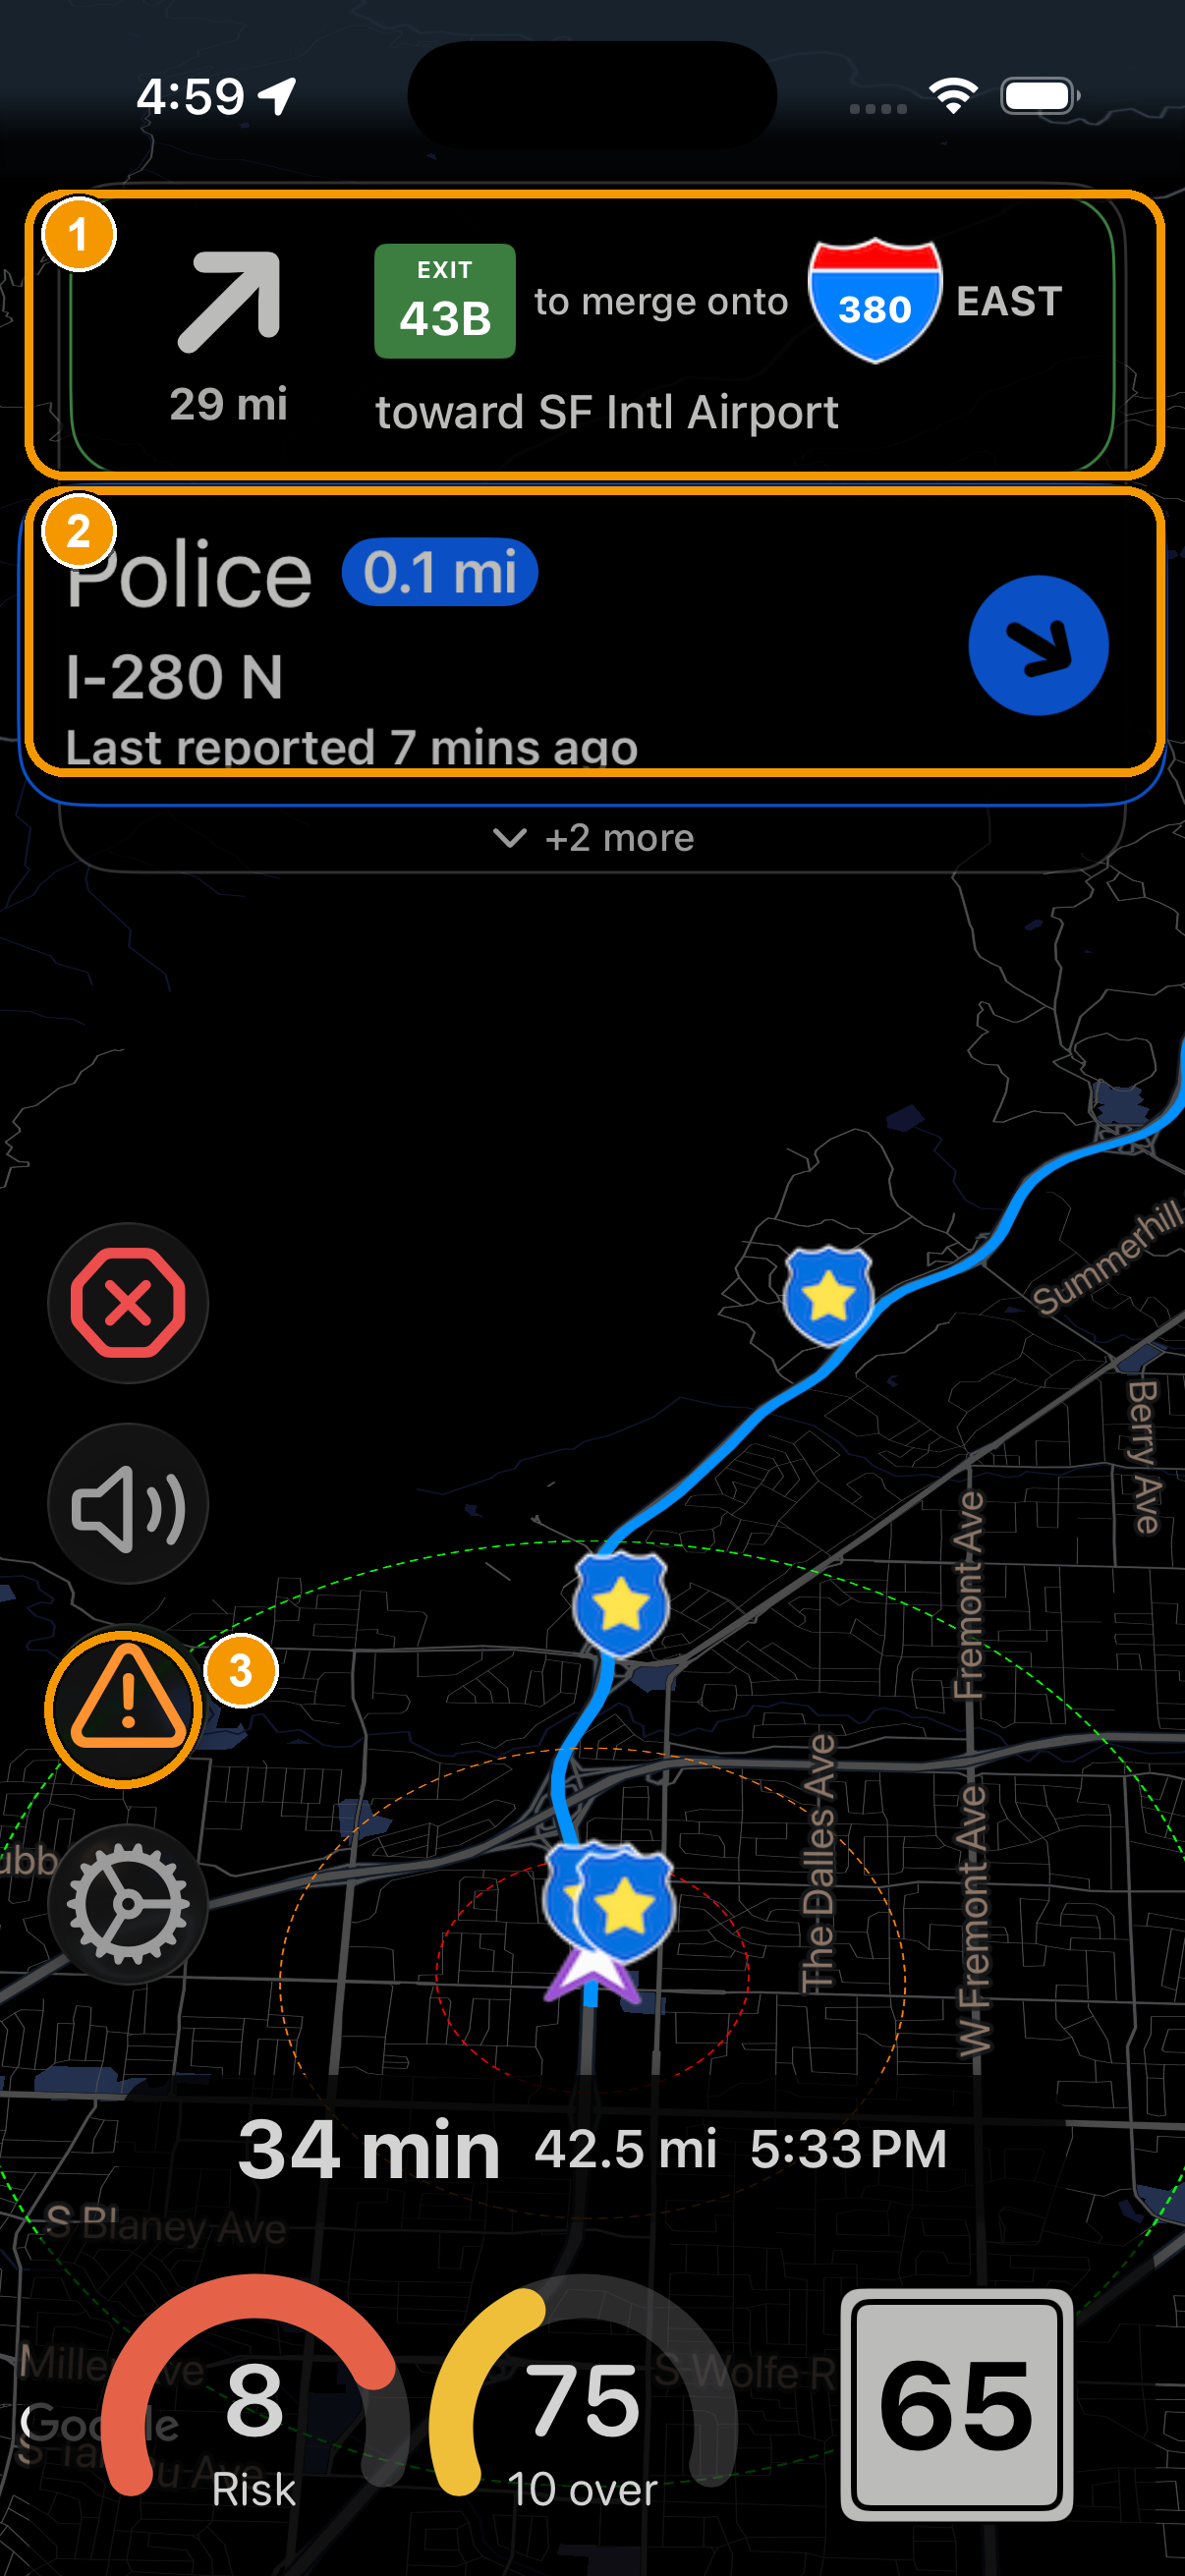
- Navigation instructions. When you're navigating, turn-by-turn directions appear at the very top.
- Alert banners. A police alert banner displayed after your report confirms that it has been shown to other drivers.
- Report button. Tap it when you pass an officer to warn other drivers.
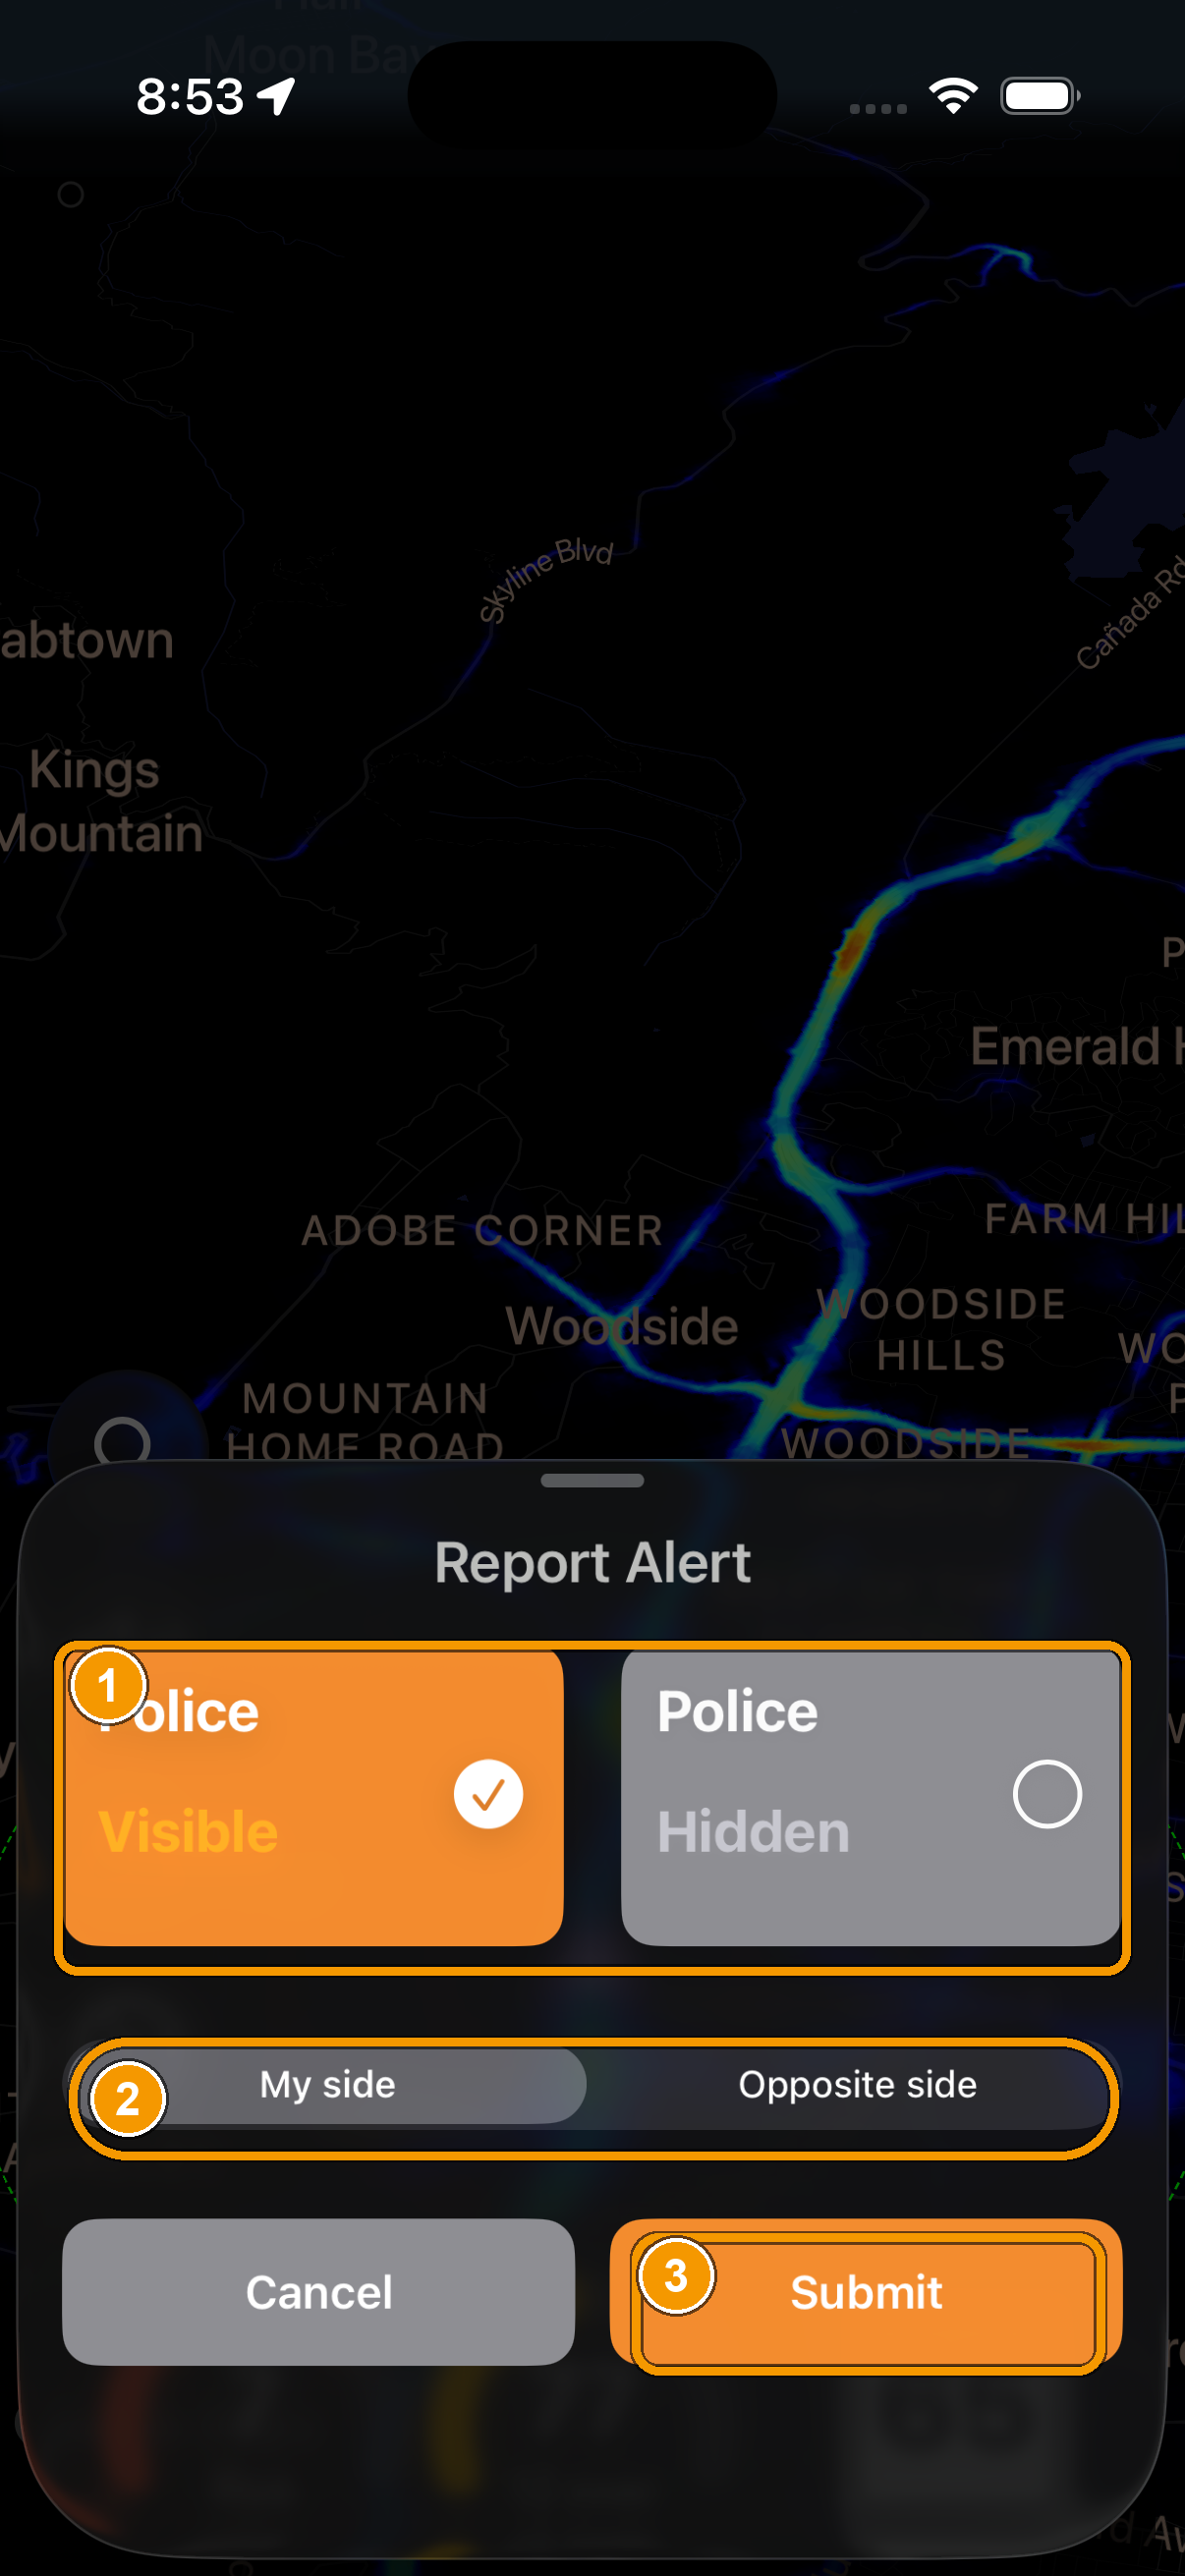
- Visibility. Mark whether the officer is in plain sight or hidden.
- Side of the road. Your side, or the opposite direction.
- Submit ends the report.
How fresh is a report, and how far ahead will I be warned? Learn more
Each police marker carries a timestamp of it's last confirmation, and this is shown in the alert banner and alert tap pop-up so you know whether a sighting is two minutes or twenty minutes old. Police alert icons also glow based on age (red: new, green: old). You can also set how long old reports keep alerting you before they're ignored in Police Alert Settings.
How far in advance you're warned is the alert distance. By default the app uses smart alert distance — it warns you sooner at highway speeds and later on slow streets, so the lead time always feels right. You can turn that off in Advanced Settings and set a fixed distance (for each alert type) yourself.
Each alert type has its own settings page (Police, Cameras, Aircraft…) where you can turn its sound, voice announcements, and other settings on or off independently. If a particular kind of alert is distracting, quiet just that one rather than muting everything.
04Risk score & heat map
The heat map shows you where enforcement sits; the risk score tells you how likely it is to be there right now.
Heat Map
The colored overlay on the map shows where speed enforcement has historically happened. Warmer, brighter areas are the spots that see a lot of activity; cooler or clear areas are quieter. It's a map of the places to watch, particularly useful when no one has reported a speed trap yet. You can change its color scheme, transparency, and width in Heat Map settings, and optionally get an audio alert when you enter a hot zone.
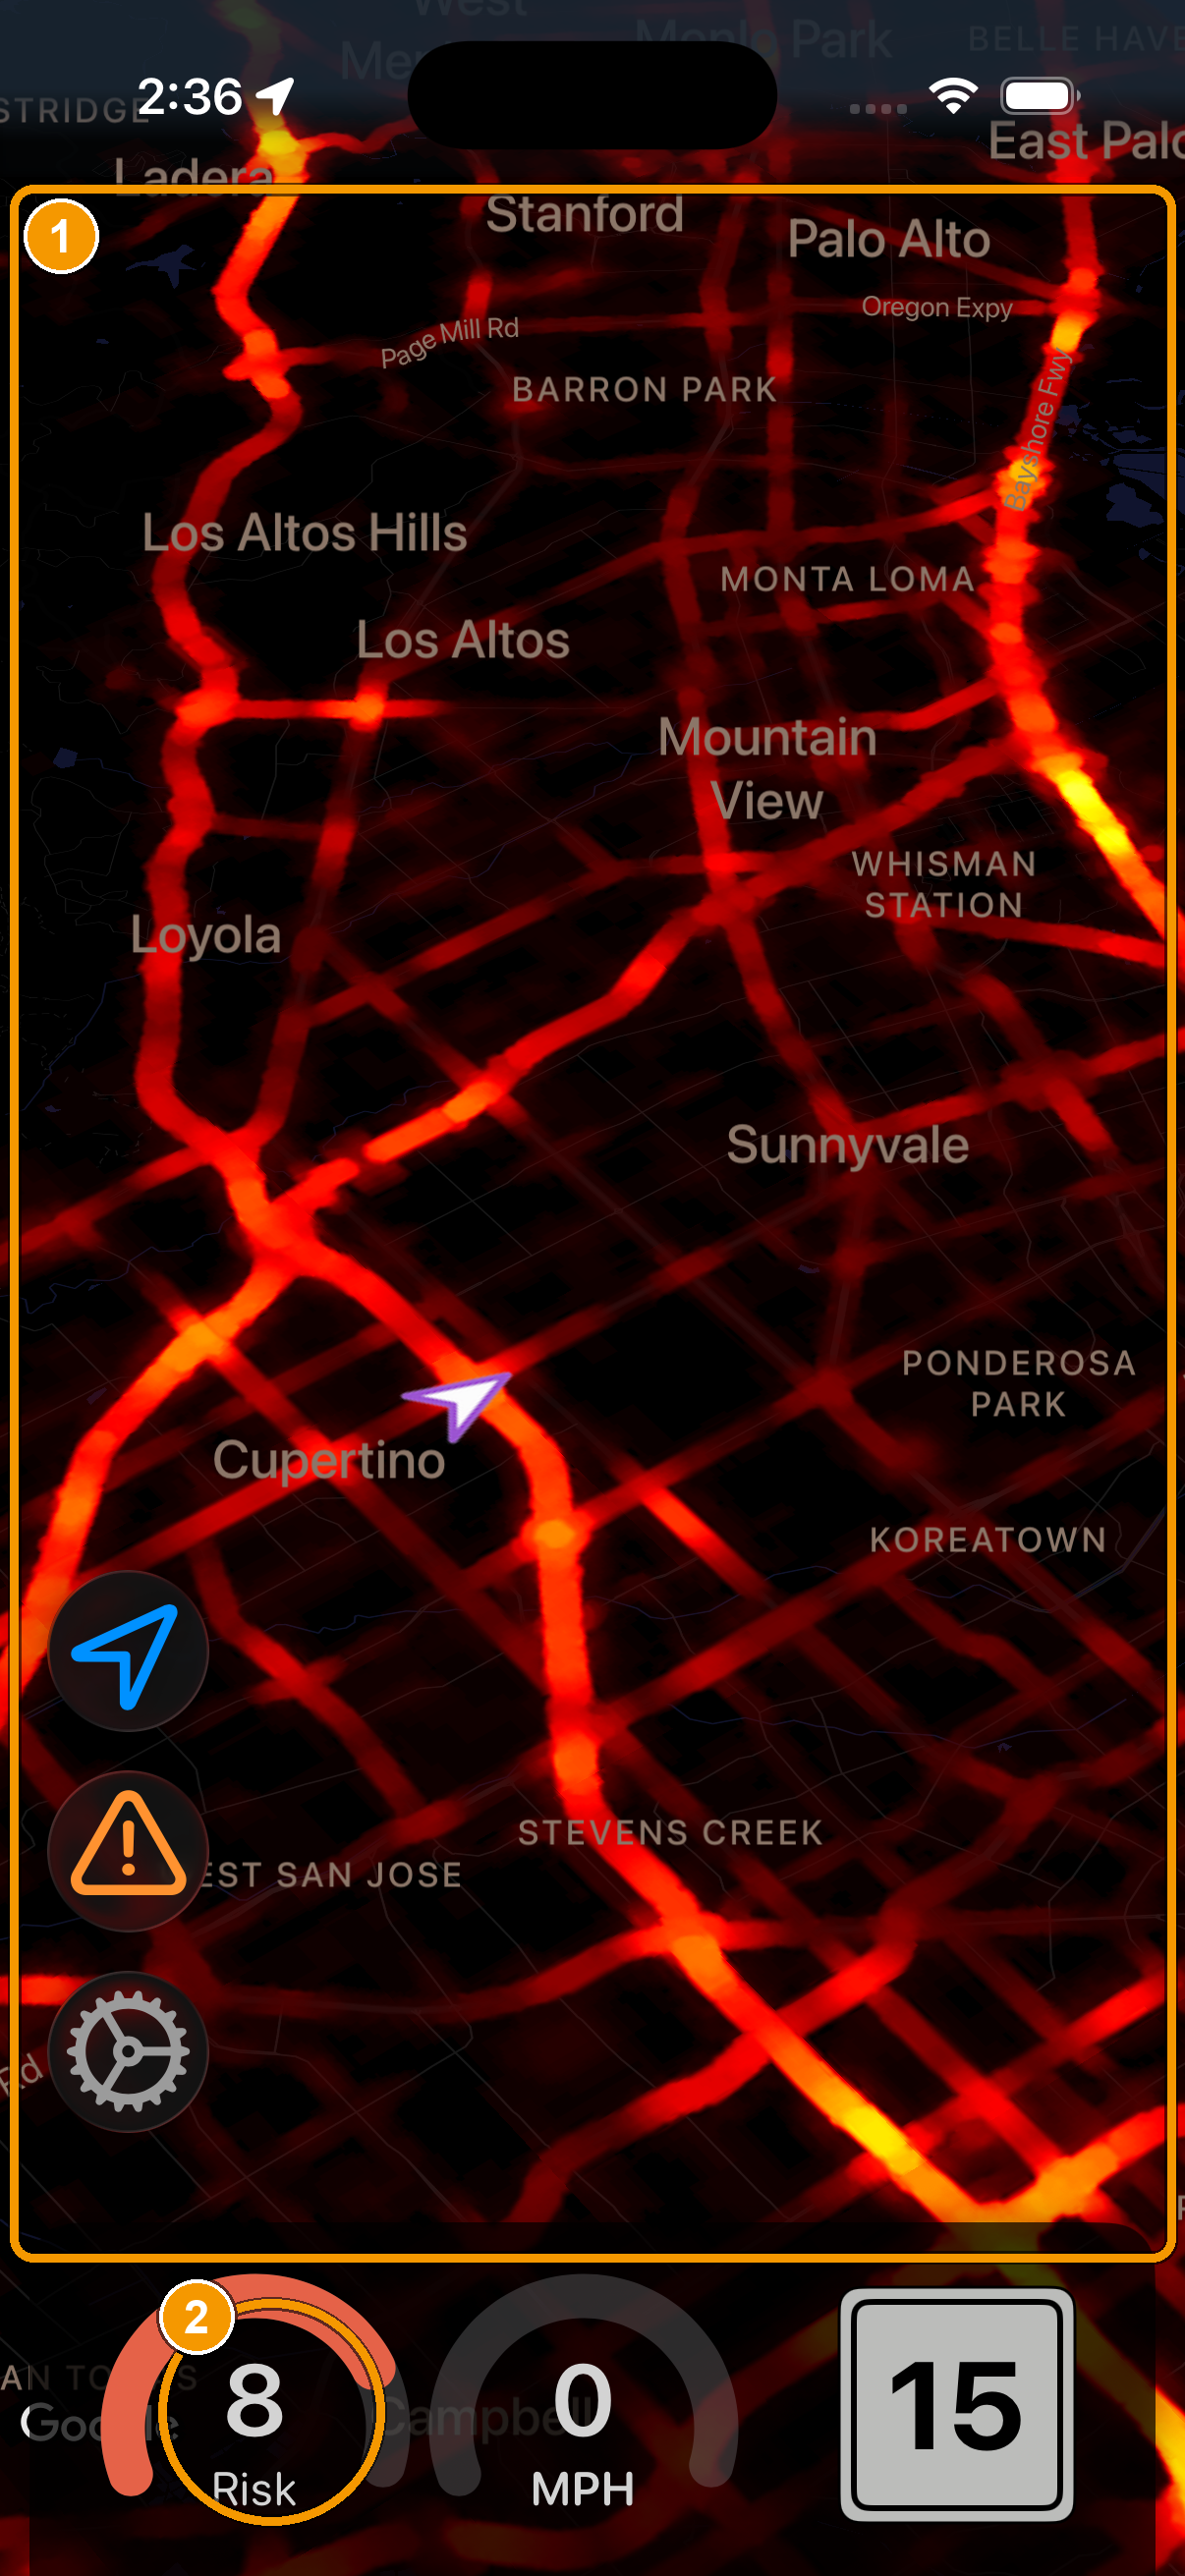
- Heat map. The colored overlay showing where enforcement has historically clustered. Warmer areas see more activity.
- Risk score. A single live reading of how likely enforcement is in your hyper-local vicinity right now.
How to read the heat map and what the colors really mean Learn more
The heat map is built entirely from crowd-sourced police reports over the past year. It shows you where reports cluster, not how often they happen there (that's the risk score's job).
Colors are relative, not absolute. The map is normalized to each area: somewhere with heavy activity overall (think downtown of a big city) gets toned down as a whole, so you can still pick out the relatively busier spots within it. So a “hot” red patch out in the country does not mean the same number of reports as a red patch downtown. Read the colors against their surroundings, not across different regions.
Because of that normalization, zooming out re-balances the colors for the bigger region, which can wash out a hot spot that stands out when you're zoomed in near a city. If you're studying one area, zoom in on it.
Appearance settings (Settings → Heat Map), all purely cosmetic: overlay opacity (about 30–100%); a choice of color schemes (Rainbow/Vivid, Lava, Pink/Vivid, green/yellow/red); and an overlay-width / dilation control (0–20) that fattens hot zones to make them easier to spot, which pairs well with the traffic layer. Pick whatever's easiest to read in your car.
Risk Score
The risk gauge at the bottom of the screen looks at your hyper local area and gives you a single live reading of how likely enforcement is to be active there at this moment. A higher reading means now is a time and place to be especially careful; a low one means it's relatively unlikely. Tap the gauge to see the details behind the number, or to change how it's displayed.
How the risk score is calculated Learn more
The score is based solely on crowd-sourced police reports from the last 365 days. For your current location, the app looks at how often a report has historically appeared at this time of day and on this type of day (weekdays and weekends are counted separately).
There are two types of risk scores supported by HighwayRadar: 10-score and 25-score. The former is easier to interpret, and the latter provides more granularity. You can change it in Settings → Advanced Settings → Risk Level Scoring Model, or just tap on the risk score. Below are the possible risk scores from both models.
10-score Model
- Risk: 1/10 (~0% in 10mi)
- Risk: 2/10 (~0% in 5mi)
- Risk: 3/10 (~0% in 5mi ±2h)
- Risk: 4/10 (<10% in 3mi ±1h)
- Risk: 5/10 (10-20% in 3mi ±1h)
- Risk: 6/10 (20-40% in 3mi ±1h)
- Risk: 7/10 (40-70% in 3mi ±1h)
- Risk: 8/10 (>70% in 3mi ±1h)
- Risk: 9/10 (>80% in 2mi ±1h)
- Risk: 10/10 (>90% in 1mi ±1h)
25-score Model
- Risk 0/25 (no reports in 10mi)
- Risk 1/25 (no reports in 5mi)
- Risk 2/25 (no reports in 5mi ±2h)
- Risk 3/25 (no reports in 3mi ±1h)
- Risk 4/25 (~0% in 3mi ±1h)
- Risk 5/25 (~5% in 2.9mi ±1h)
- Risk 6/25 (~10% in 2.8mi ±1h)
- Risk 7/25 (~15% in 2.7mi ±1h)
- Risk 8/25 (~20% in 2.6mi ±1h)
- Risk 9/25 (~25% in 2.5mi ±1h)
- Risk 10/25 (~30% in 2.4mi ±1h)
- Risk 11/25 (~35% in 2.3mi ±1h)
- Risk 12/25 (~40% in 2.2mi ±1h)
- Risk 13/25 (~45% in 2.1mi ±1h)
- Risk 14/25 (~50% in 2mi ±1h)
- Risk 15/25 (~55% in 1.9mi ±1h)
- Risk 16/25 (~60% in 1.8mi ±1h)
- Risk 17/25 (~65% in 1.7mi ±1h)
- Risk 18/25 (~70% in 1.6mi ±1h)
- Risk 19/25 (~75% in 1.5mi ±1h)
- Risk 20/25 (~80% in 1.4mi ±1h)
- Risk 21/25 (~85% in 1.3mi ±1h)
- Risk 22/25 (~90% in 1.2mi ±1h)
- Risk 23/25 (~95% in 1.1mi ±1h)
- Risk 24/25 (~100% in 1mi ±1h)
- Risk 25/25 (~100% in 0.75mi ±1h)
05Cameras
HighwayRadar maps three kinds of fixed cameras from verified databases and warns you as you approach each one.
- Speed cameras: Fixed and mobile speed-enforcement cameras.
- Red-light cameras: Cameras at intersections that ticket for running a light.
- ALPR cameras: Automated license-plate readers that record passing plates.
Each type can be shown on the map and can alert you, independently. In Camera Alert Settings you can turn each category on or off, choose whether it makes a sound, and set the camera alert distance.
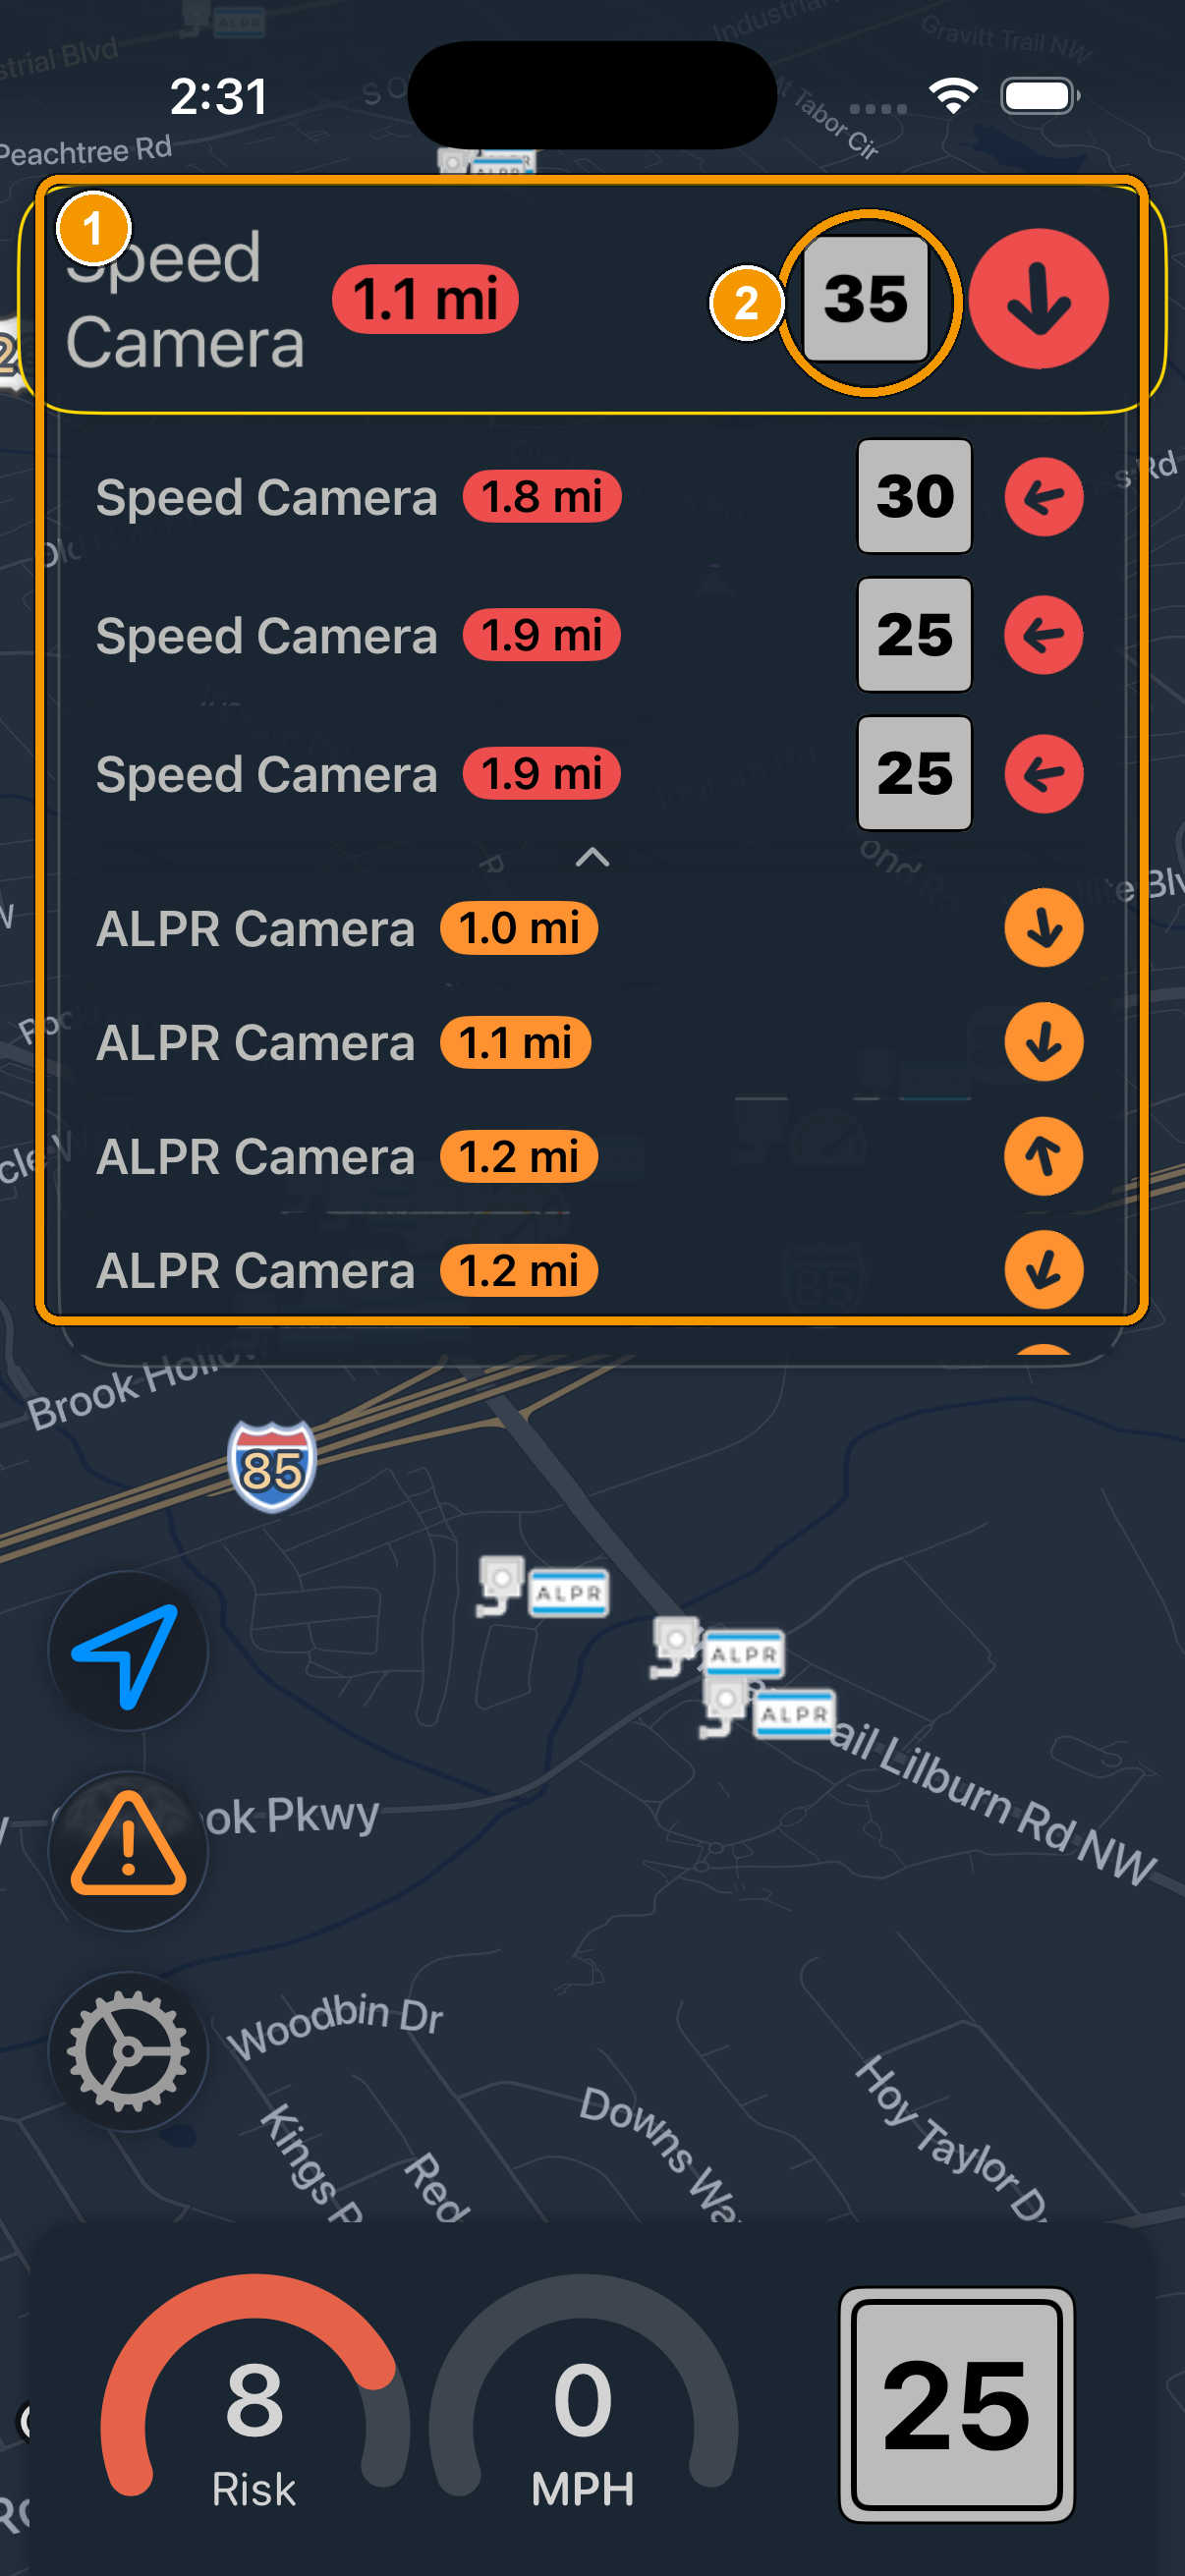
- Camera list. Every upcoming camera, by type (speed, red-light, ALPR) and how far ahead it is.
- Posted limit. For speed cameras, the speed limit enforced at that camera's location.
Camera locations come from multiple maintained databases, so they're best treated as “known fixed locations.” Live, on-the-spot enforcement is what the crowd-sourced police reports and your radar detector are for, and together they cover both the permanent and the temporary.
06Aircraft enforcement
In some areas, speed is enforced from the air. HighwayRadar tracks aircraft commonly used for that and shows nearby ones on your map.
Planes and helicopters appear as markers with their live position. You control how much of this you see:
- Tracking radius: How wide an area around you to watch for aircraft.
- Include unknown aircraft: Whether to show aircraft that can't be positively identified, or only confirmed enforcement types.
- Filter Civil Air Patrol: Hide search-and-rescue / training flights that aren't doing enforcement.
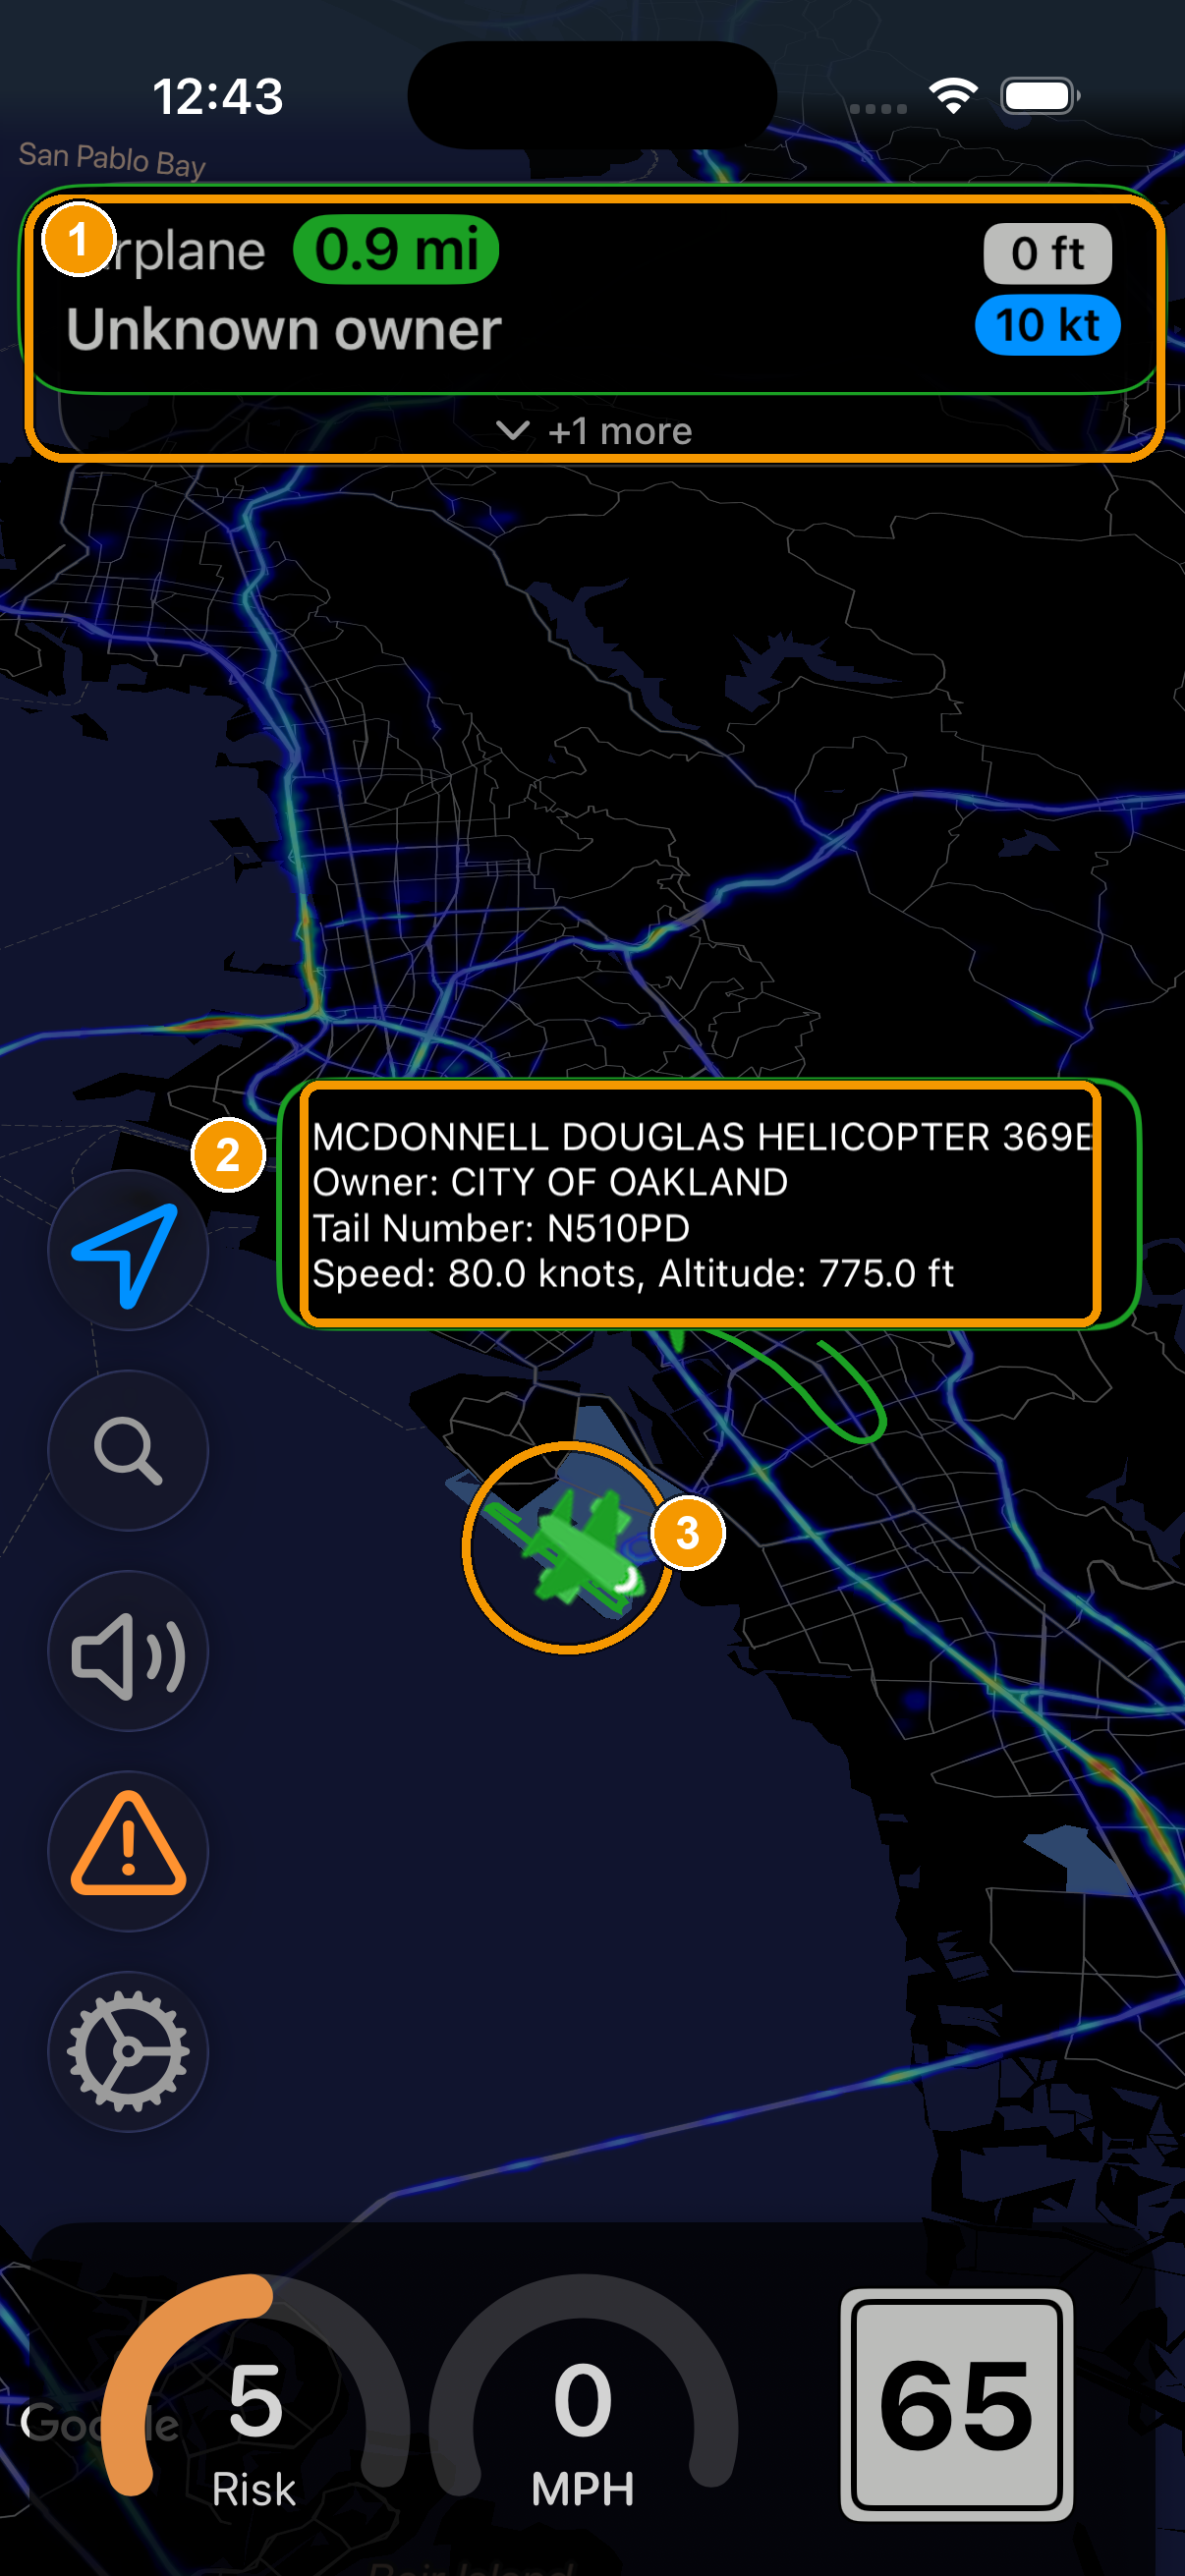
- Aircraft alert. The banner specifies plane or helicopter, and shows distance, altitude, and speed.
- Marker details. The info shown when you tap the aircraft: make/model, tail number, owner, speed, and altitude.
- Aircraft marker. The plane or helicopter's live position on the map.
If you drive somewhere aircraft enforcement is rare, you can leave aircraft alerts off to reduce battery consumption and reduce on-screen clutter. If you regularly drive open highways where it's common, widen the tracking radius so you get more notice.
07Alert modes & range rings
Two tools control which threats you hear about and help you judge how far away they are.
Alert Mode
Accessible in Advanced Settings, Alert Mode decides which markers on the map actually warn you. The basic idea: do you only want alerts for threats on the road you're driving, for everything around you, or something in between? If you find you're getting warned about police on a road you're not even on, switch to the on-route mode. If you want maximum awareness in a dense area, switch to one of the broader modes.
These alert modes do not apply to aircraft.
Which mode should I pick? Learn more
Current Street is the quietest, most relevant setting for highway driving where a threat e.g. “500 ft away” on a frontage road isn't your concern.
I generally recommend using In Front paired with Smart Alert Distance, which alerts you to anything that is or could become relevant.
Range rings
Range rings draw evenly-spaced circles around your position on the map, so you can instantly gauge how far away a marker is. “That's just inside the second ring, so about a mile out.” Toggle them in Map Settings, and turn on distance labels if you want each ring's distance written on it. Distances can be shown in miles or kilometers (see bottom of Advanced Settings) to match your preference.
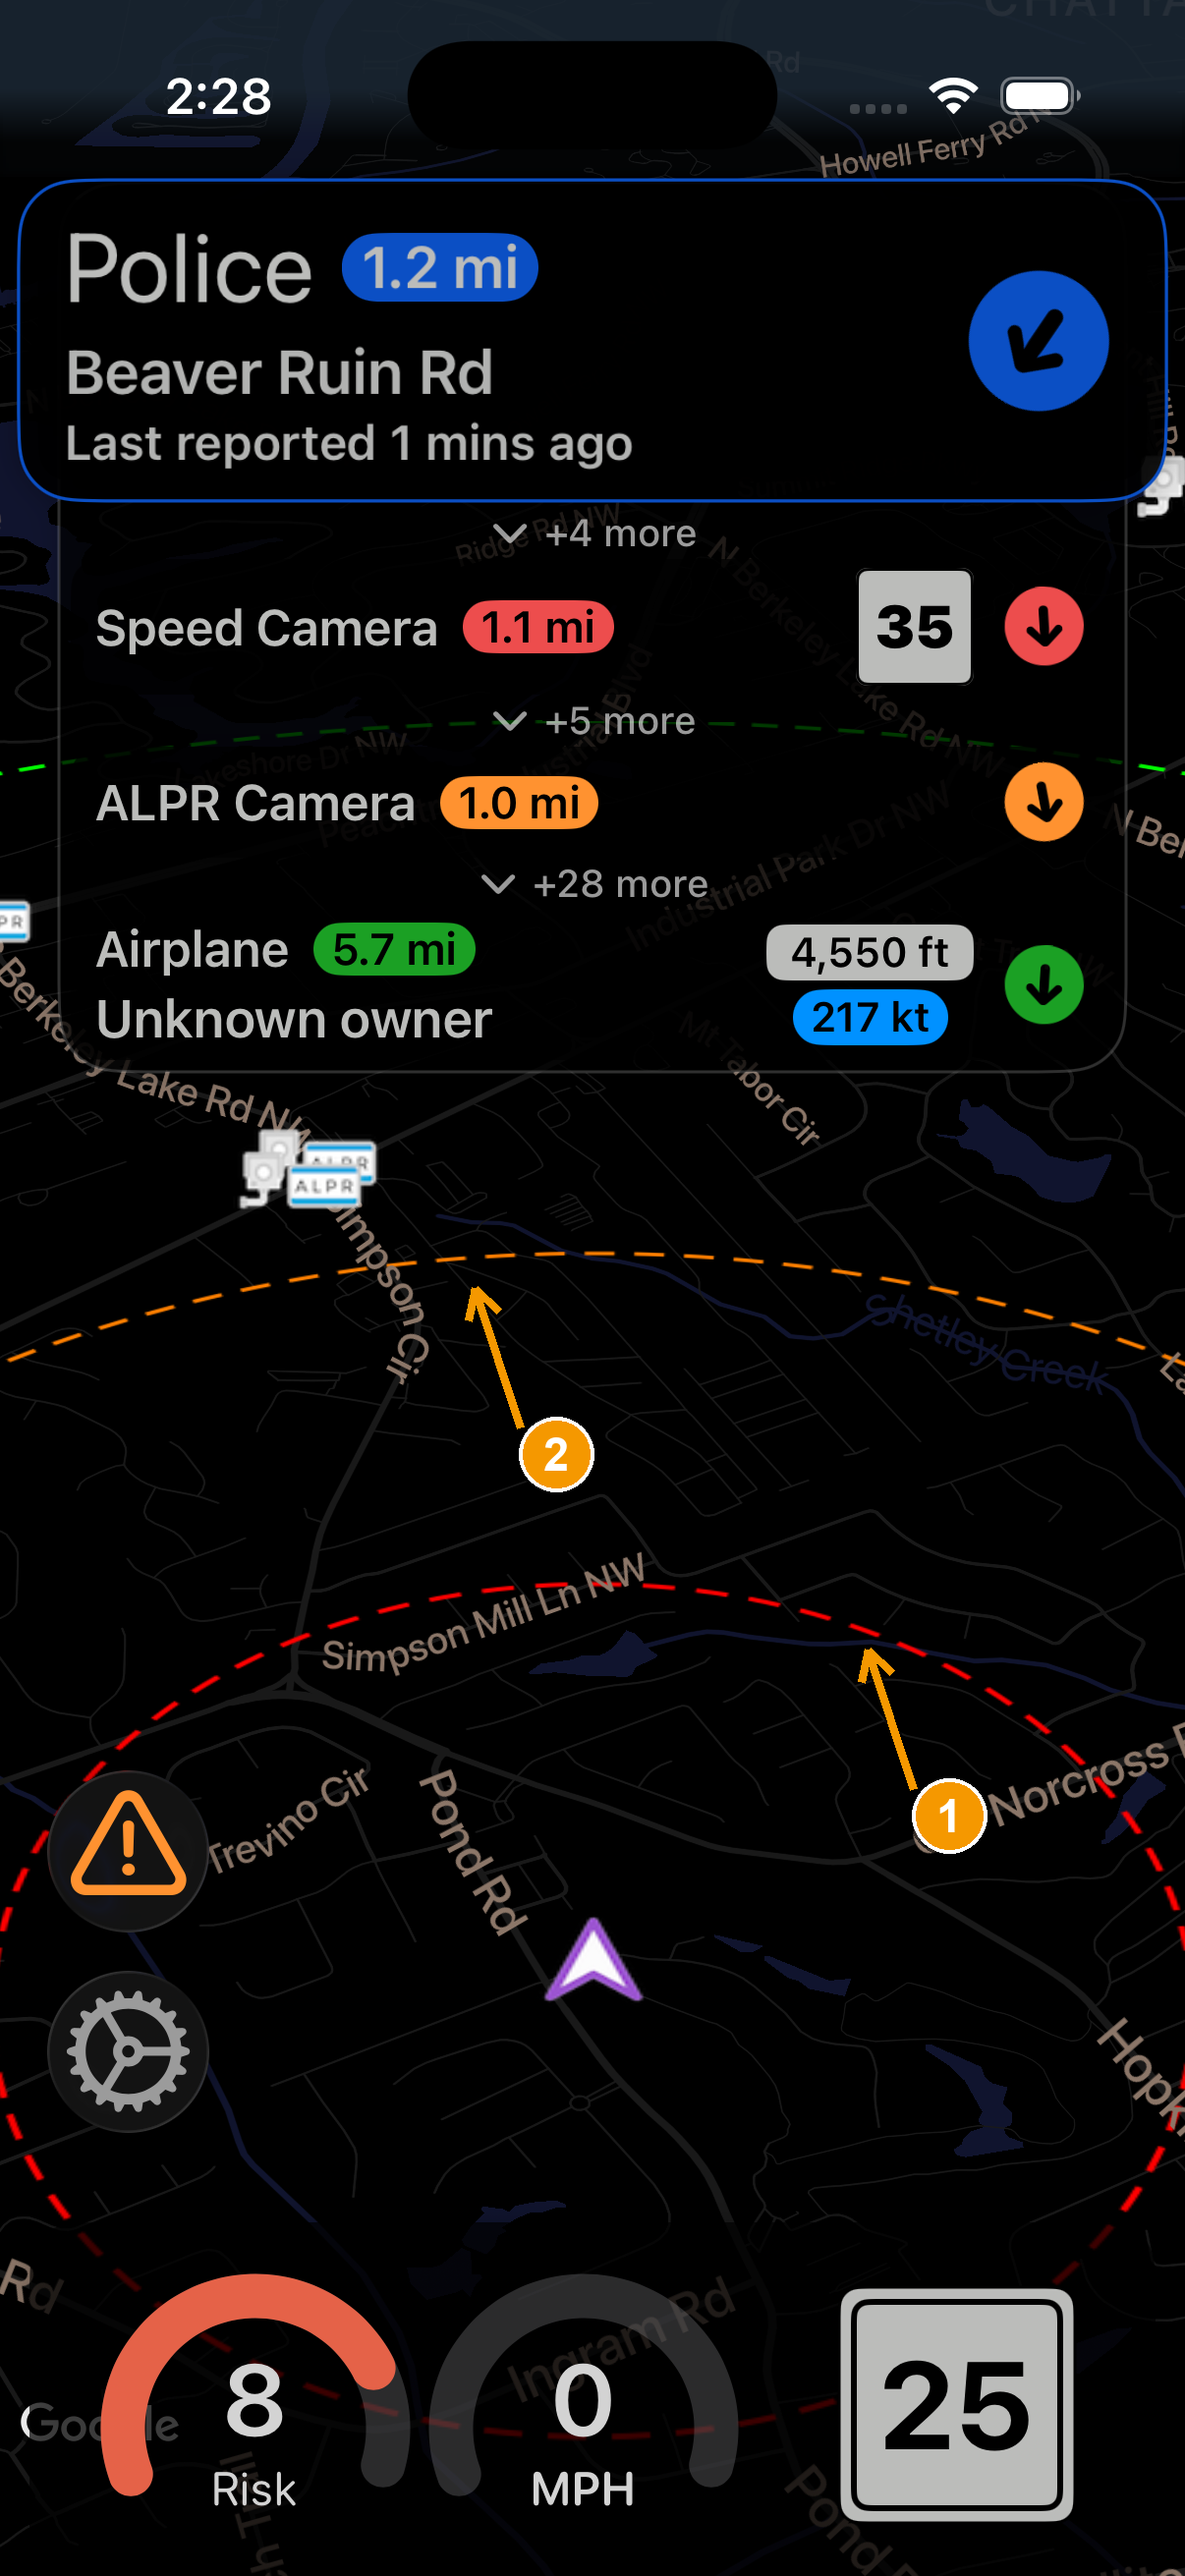
- Inner ring. Generally a 0.5 mile radius from your location. Some devices' scale can have a small effect on this distance.
- Outer ring. Generally a 1.0 mile radius from your location.
08Connecting a radar detector
If you own a compatible hardware radar detector, HighwayRadar can connect to it over Bluetooth and bring its live radar & laser alerts onto the same screen as your other alerts, plus add smart features your detector doesn't have on its own.
Supported detectors
- Uniden R4 / R4w
- Uniden R8 / R8w
- Uniden R9
- Valentine One Gen2
- Radenso DS1
Pairing, step by step
- Power on your detector and make sure its Bluetooth is enabled (check your detector's manual if you're not sure — it's on by default for most).
- Open Settings → Radar Detector Settings in HighwayRadar.
- If you have a Uniden radar detector, you MUST go to Expert Settings → BT Pairing BEFORE continuing to step 3.
- Pick your detector model and tap to connect (or rescan if necessary). The app scans over Bluetooth and shows nearby detectors. Choose yours from the list.
- Wait for “connected.” Once paired, radar and laser alerts from the detector appear in the alert banner alongside your other alerts.
- Turn on auto-connect (optional) so the app reconnects to your detector automatically every time you get in the car.
Sometimes HighwayRadar's BT connection protocol doesn't play nice with other apps. If it can't find or connect to your detector, disconnect your detector from and close any other detector app that you're using, then try again. Once you're connected to HighwayRadar you should be able to reconnect to your other app(s).
Smart muting: fewer false alarms
HighwayRadar's intelligent muting keeps your detector quiet when an alert doesn't matter and speaks up when it does. You can mute based on:
- Speed: Stay silent below a speed you set (no beeping while parked or crawling in traffic).
- Speed vs. the limit: Only alert when you're actually over the posted limit (or an amount over).
- Delay: Auto-mute after 1-5 seconds.
- Weak signals: Ignore faint, far-away signals until they're strong enough to matter.
- Direction: Mute alerts coming from the rear or sides.
- Known false-alarm sources: Suppress the common “5G” / automatic-door style K-band false alerts.
- Band: Mute all alerts of any given band.
- K-band Quiet Ride: Mute K-band below a given speed but keep Ka and laser loud.
Lockouts
The app can remember lockouts (specific spots where a signal is a known false alarm) and mute them automatically next time, optionally syncing those lockouts with detectors that support it. Lockouts can be added or removed in Radar Detector Settings → Alert History
Display control, reconnection, and radar source estimation Learn more
Display control: you can have the app turn the detector's own screen off (always, or only while connected) so you're looking at one screen instead of two.
Reliable reconnection: alongside auto-connect there's an aggressive reconnect option for cars where Bluetooth tends to drop, and a power-save mode that can kick in when the detector disconnects.
Radar source estimation is an experimental feature that tries to estimate where a radar signal is coming from. As the app notes in-product, it's experimental, so accuracy isn't guaranteed and it may increase battery use, so leave it off unless you want to experiment.
Alert History
Every radar and laser alert your detector picks up is logged so you can review it later. Open Settings → Radar Detector Settings → Alert History to see running statistics (total alerts, how many were K band, Ka band, and laser, and the percentage that were automatically locked out), followed by a list of your recent alerts. Tap any one to see its details and where it happened on a map, and use Export to CSV to save or share the whole log.
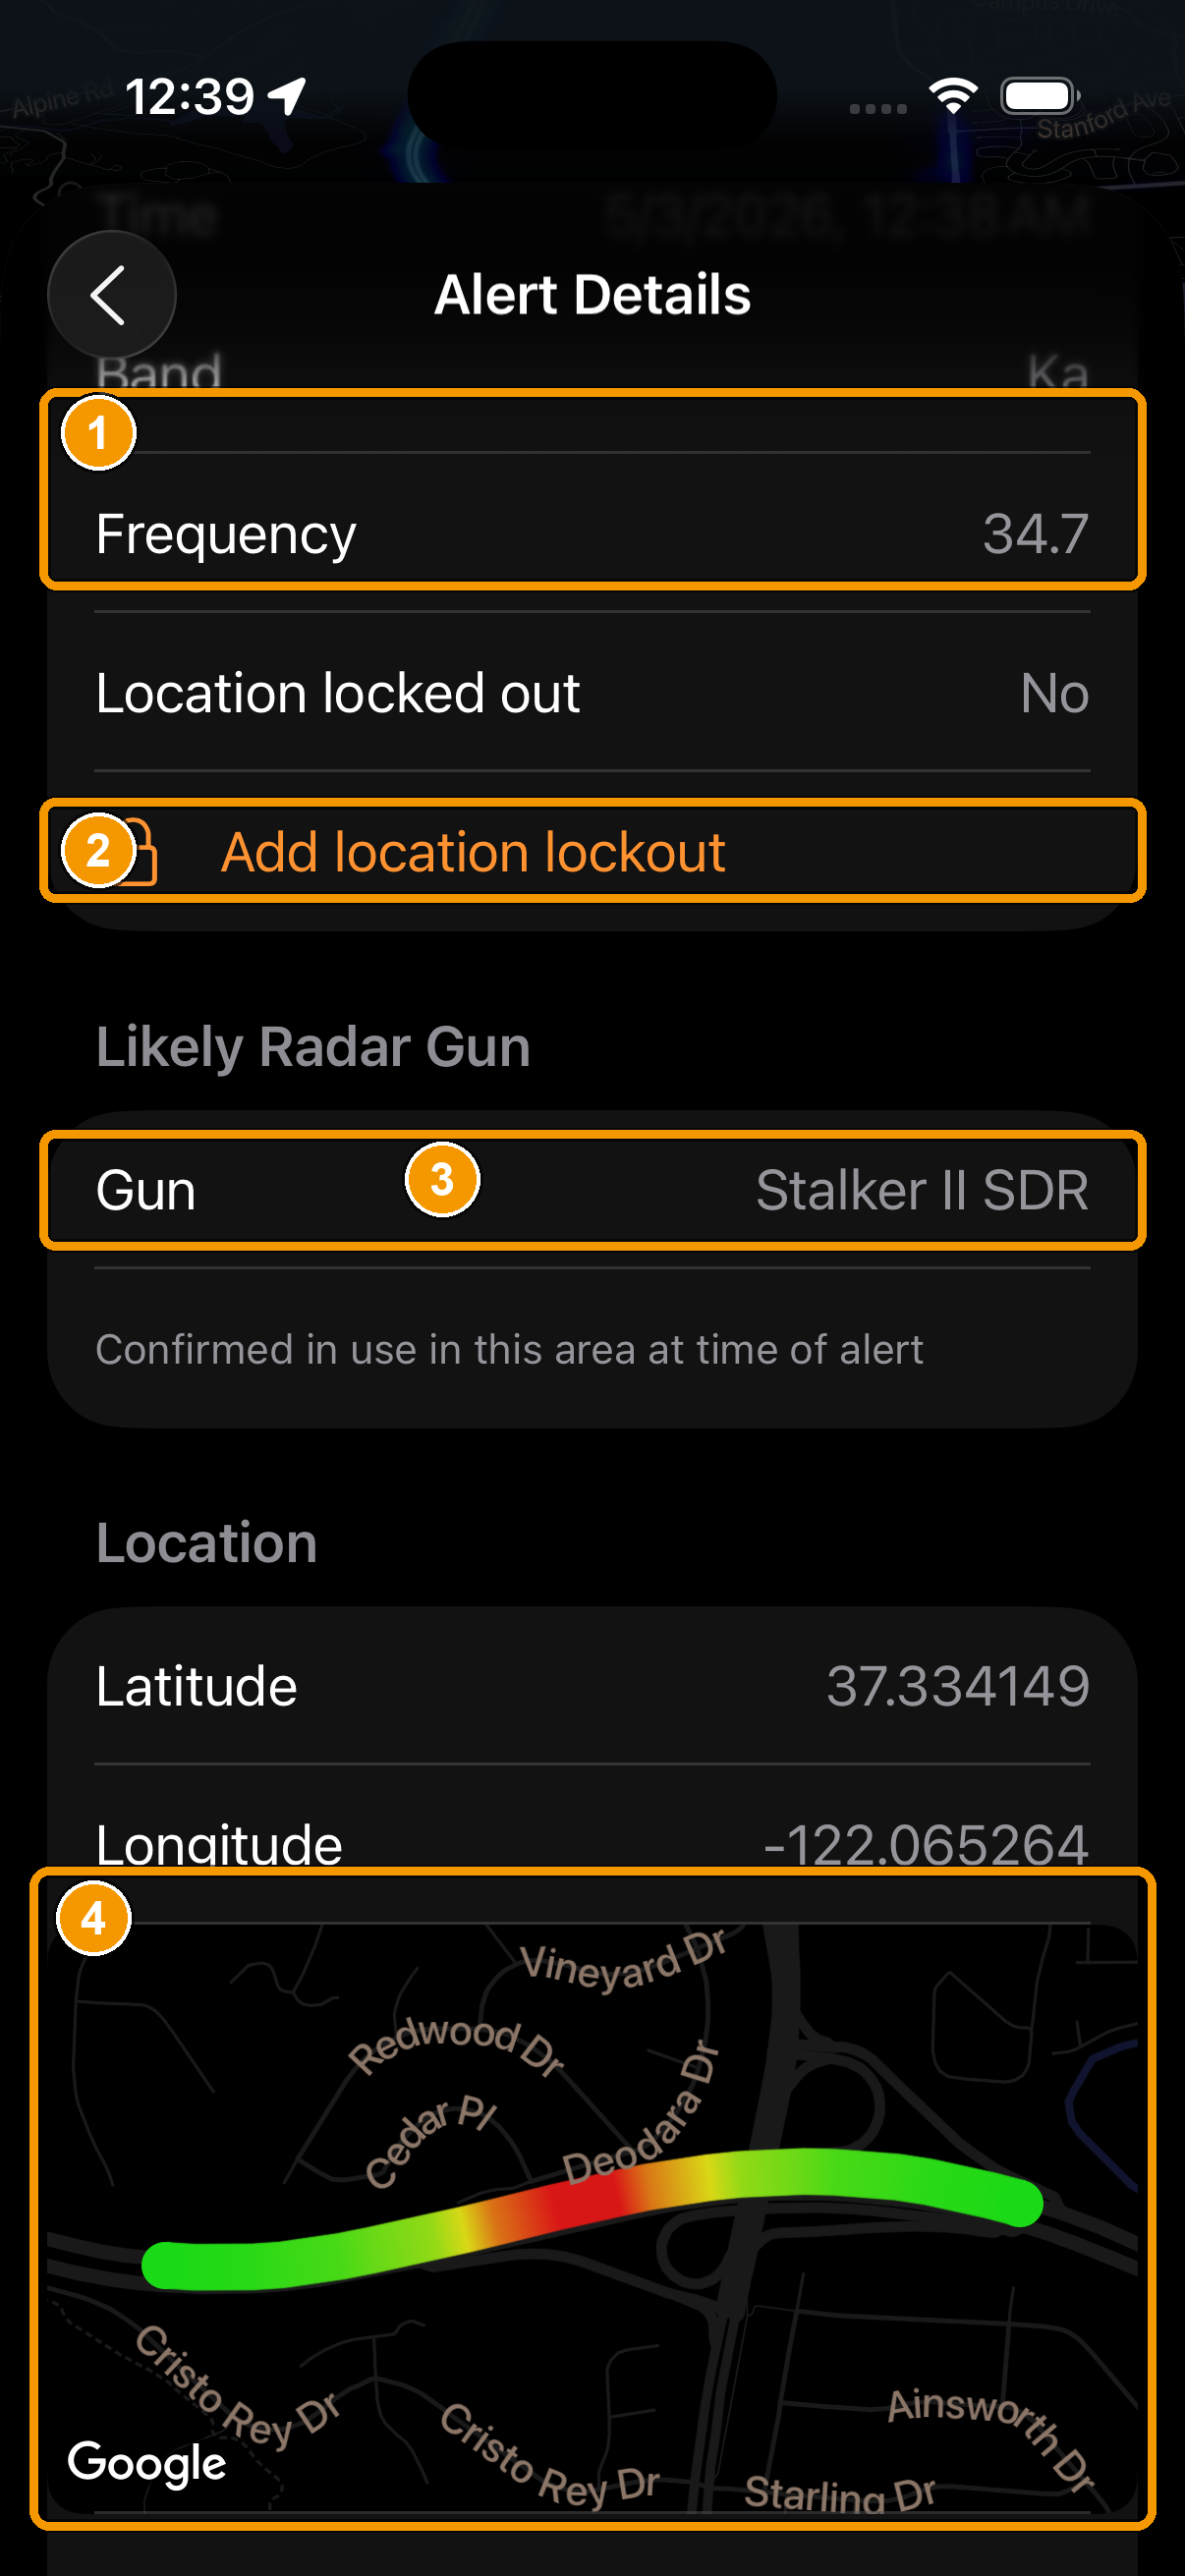
- Signal details. The encounter's time, band, and frequency.
- Add location lockout. Mark this spot as a known false alarm so it's muted automatically next time. This will sync to your detector if it supports that functionality (Uniden/Radenso).
- Likely radar gun. The specific gun the app believes is in use here, based on the frequency and local intel (provided by rdfrltm.com).
- Encounter map. The colored trace shows how the signal's strength changed as you passed. Green where it was weak, red where it peaked.
10Local enforcement intelligence
Beyond live alerts, HighwayRadar can brief you on the place you're driving with info about the local tactics, the law, and what a ticket actually costs.
Enforcement overview
As you cross into a new county, the app can show (and optionally announce) an enforcement overview for that area, including the equipment (like specific radar guns/frequencies) and tactics local agencies are known to use. This information is sourced from rdfrltm.com. You choose whether the county is announced aloud and/or displayed on entry.
Speeding fines & state law
The app can also surface local speeding-fine ranges and a summary of the relevant state law, so you know the stakes for where you are. Fine data can be announced automatically when you enter a new area. This information is sourced from various government and polling institutions, and the sources are shown at the bottom of the Local Enforcement page.
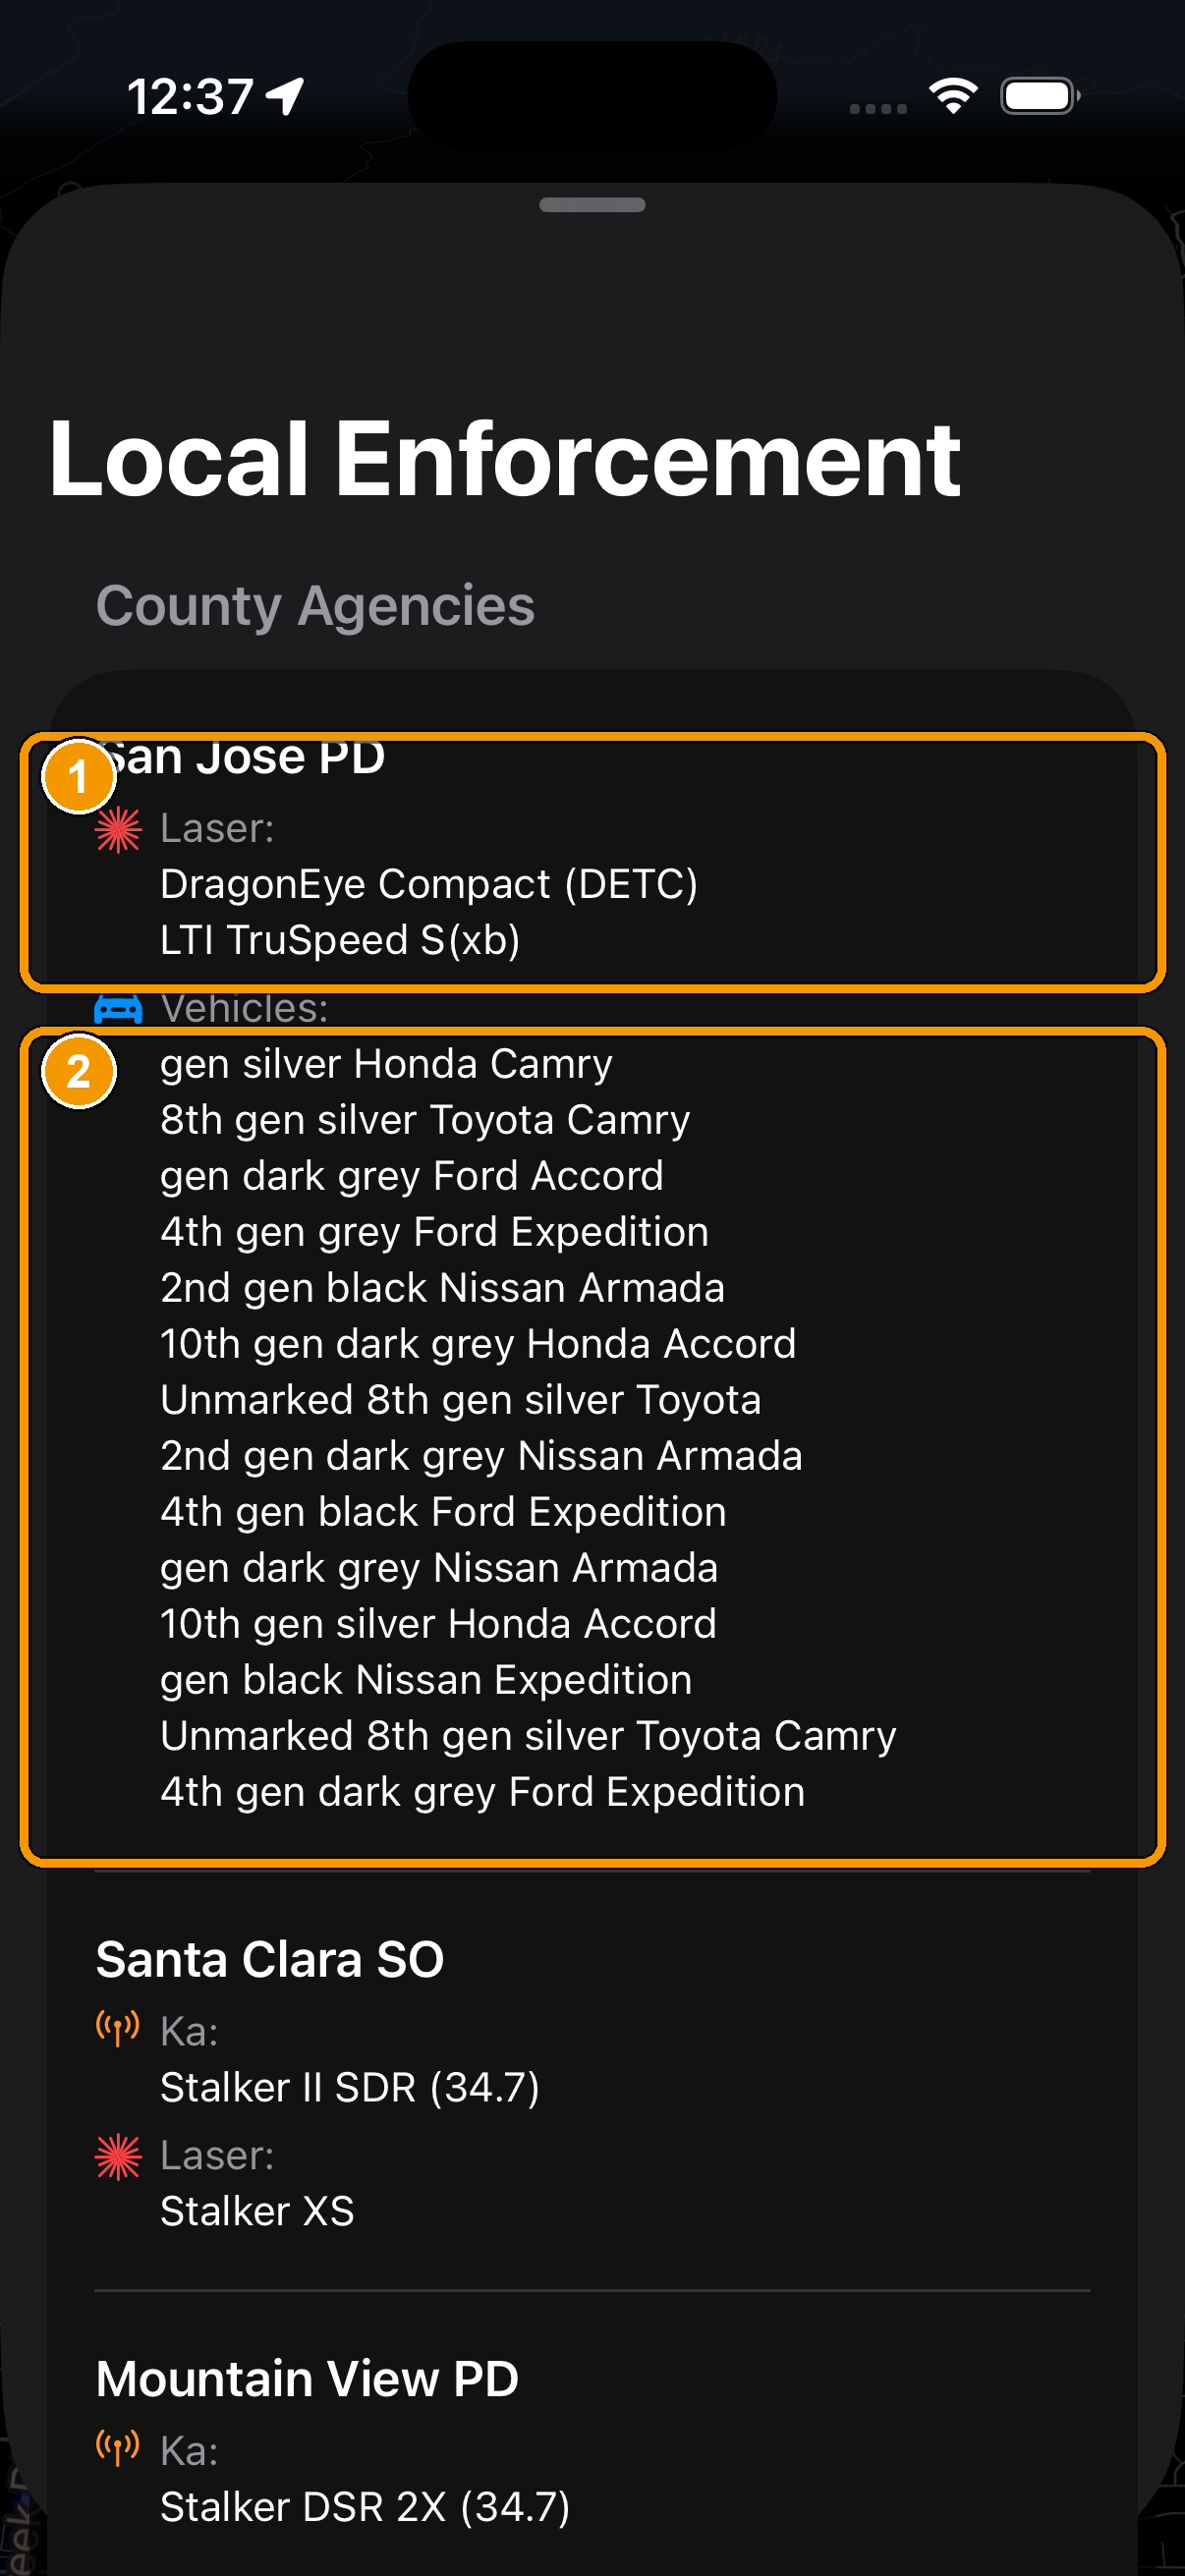
- Agency & equipment. Each local agency and the specific radar/laser guns it's known to run.
- Vehicles to watch for. The makes and models used in the area.
This information is provided for general awareness only and is not legal advice. Laws and fines change, and the figures shown reflect their source at the time of publication. For any and all legal matters, consult an attorney.
11Navigation & CarPlay
Turn-by-turn navigation
Search for a destination and let HighwayRadar guide you there, so you keep all your alerts on screen instead of switching between apps. Navigation settings let you choose voice guidance, an optimized driving zoom, whether to avoid tolls, highways, or ferries, and whether to get turn notifications while the app is in the background.
CarPlay
HighwayRadar has full CarPlay support, so your alerts and map appear right on your car's built-in dashboard screen. Just plug in (or connect wirelessly if your car supports it) and pick HighwayRadar from your CarPlay home screen. You'll see the driving dashboard with your speed, the speed limit, the risk reading, alert banners, and the map, all sized for the car display.
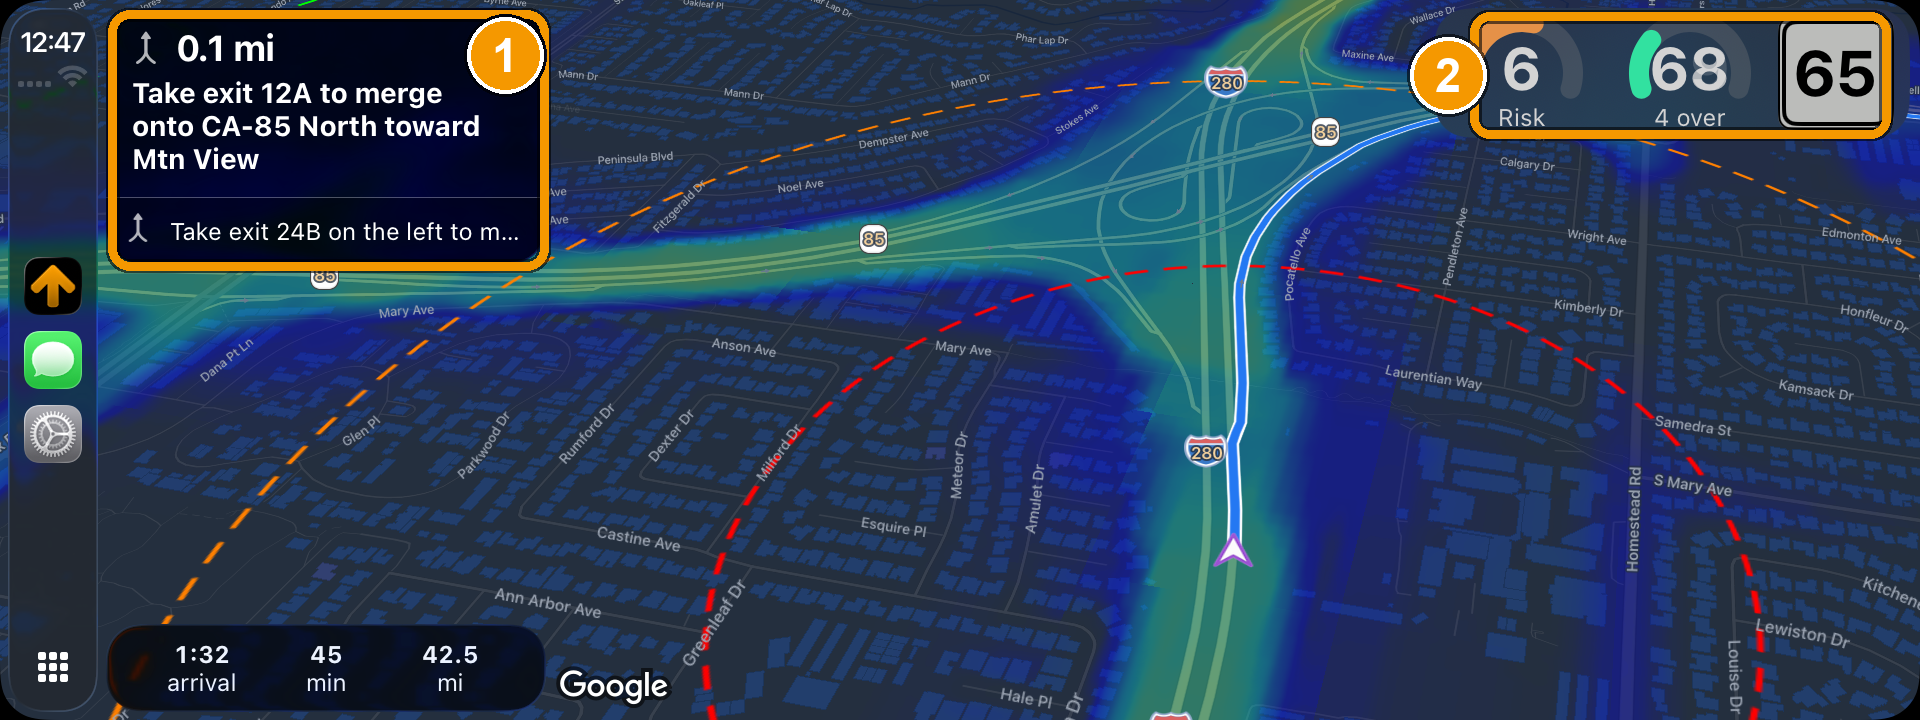
- Turn-by-turn instructions.
- Live dashboard. Same as the phone app.
You can choose whether the map is shown on CarPlay or on your phone in Map Settings. This is handy for users who want to connect to CarPlay but see HighwayRadar on their phone and another app on CarPlay.
12Settings map
A complete map of every setting and where to find it, grouped by the menu it lives under. Skim for what you want, or use the search box at the bottom of Settings (or ctrl + f on this page) to jump straight to a setting by name. The § tag on each group points to the section that explains those settings in depth.
Visual Theme §2
- App theme: Light, Dark, or Follow iPhone
- Auto theme by local sunrise & sunset
Heat Map §4
- Show heat map & hot-zone audio alert
- Color scheme (Rainbow/Vivid, Lava, Pink/Vivid, Green-Yellow-Red)
- Transparency / opacity (~30–100%)
- Overlay width / dilation (0–20)
Police §3
- Alert sound & voice announcements
- Police alert distance
- Age glow (red = new → green = old)
- Flash on alert
- Report-confirmation prompts
- How long old reports keep alerting
Cameras §5
- Speed cameras on / off
- Red-light cameras on / off
- ALPR cameras on / off
- Sound per camera type
- Camera alert distance
- Marker clustering
Aircraft §6
- Tracking radius
- Alert style
- Include unknown aircraft
- Filter Civil Air Patrol flights
Radar Detector §8
- Detector model picker & Bluetooth pairing
- Auto-connect & aggressive reconnect
- Auto Power Save on detector disconnect
- Smart muting: by speed, speed vs. limit, delay (1–5s), weak signals, direction, known false sources, band, and K-band Quiet Ride
- Lockouts & lockout sync
- Display control (turn the detector's screen off)
- Radar source estimation (experimental)
- Alert History: stats, log, Export to CSV
Map §2 §7 §11
- Default zoom level
- Speed-sensitive zoom
- Show traffic on map
- Range rings & distance labels
- Auto-recenter
- Your location icon
- Show map on CarPlay or on phone
Audio §3
- Voice vs. beep alerts
- Alert volumes
- Force audio through the phone speaker
Navigation §11
- Voice guidance
- Optimized driving zoom
- Avoid tolls / highways / ferries
- Background turn notifications
Advanced §7 §4
- Alert Mode (Current Street / In Front / Within Radius)
- Smart alert distance
- Risk Level Scoring Model (10 / 25)
- Background notifications
- Flash count
- Personal speed limit
- Units (miles / kilometers)
- Auto Power Save (after 10 min in background)
- Clear cache
Language & About
- App language
- Version info
- Support links
13Recommended setups
Here are some combinations of settings worth dialing in by hand for different kinds of driving. Treat them as starting points and mix and match. Each line points you to the section that explains the setting in full.
Highway & road trips
Best for: long stretches at speed
- Alert Mode → "Current Street", so you're not warned about threats on frontage and parallel roads (§7).
- Keep smart alert distance on (in Advanced Settings) for earlier warnings at highway speed (§3).
- Widen the aircraft tracking radius. Open highways are where air enforcement is most common (§6).
- Turn on speed-sensitive zoom so the map pulls back as you go faster (§2).
- Range rings on to judge the gap to what's ahead (§7).
- Heat map on in case you're the first car past a fresh speed trap (§4).
City & daily commute
Best for: dense surface streets and frequent turns
- Alert Mode → nearby / all, since parallel roads and cross streets genuinely matter here (§7).
- Turn off ALPR cameras. These clutter the map in metro area. Leave speed red-light camera alerts enabled but disable audio alerts if camera density results in too many alerts.
- Shorter alert distances, so warnings don't fire too early in stop-and-go traffic (§3, §5).
- Heat map on to spot the corners and blocks that are known trouble (§4).
Radar-detector drivers
Best for: a paired Uniden, Valentine One, Radenso, or ALP
- Turn on auto-connect (and aggressive reconnect if your car's Bluetooth tends to drop) (§8).
- Smart muting: mute below a set speed and the speed limit, mute after a short delay, mute weak signals, and suppress the common 5G / K-band false alerts (§8).
- Enable only the bands you want, and use K-band Quiet Ride to calm the chatty K band (§8).
- Use lockouts so known false-alarm spots are skipped automatically (§8).
- Optionally turn the detector's own display off so you're watching just one screen (§8).
Maximum awareness
Best for: “warn me about everything”
- Alert Mode → "Within Radius", and include alerts behind you (§7).
- Every source on — police, all cameras, aircraft (including unknown aircraft), and the heat map (§3–§6).
- Turn on screen flash and alert glow for hard-to-miss visual warnings (§3).
- Traffic map layer on for live traffic awareness (§9).
Minimal & quiet
Best for: the least possible distraction
- Alert Mode → on-route only to cut everything that isn't directly ahead (§7).
- Silence the alert types you don't care about on their individual settings pages, leaving sound on only for the ones you do (§3). I recommend police on, cameras and aircraft off.
- Dim the heat map (raise its transparency) or turn it off (§4).
Battery saver
Best for: long sessions or a low battery
- Turn on Auto Power Save (Advanced) so the app rests after 10 minutes in the background (§1).
- If you run a detector, turn on Auto Power Save on disconnect (§1, §8).
- Turn aircraft tracking off. It keeps a live connection open, which uses battery (§6).
- Turn off the traffic overlay and use a higher default map zoom to lighten the load (§2).
- You could turn the heat map off, but this is one of the most important features in my opinion. (§4).
14Frequently asked questions
Do I need a radar detector to use HighwayRadar?
No. HighwayRadar is fully useful on its own, and the heat map alone makes it worth it in my opinion. Crowd-sourced police reports, cameras, aircraft tracking, the heat map, and risk scores all work with just your phone. A hardware radar detector is an optional add-on that layers live radar & laser detection on top.
Is the app free? Is there a free tier?
You get a few free sessions to try the whole app when you first install it. After that, you'll need an active subscription to keep using the app (since every use costs me real money) but there's a free trial (3 or 7 days) as well. Use the free sessions to set everything up and decide whether it's for you.
Will it keep alerting me with my phone locked or while I'm using maps?
Yes, as long as you grant background (“Allow While Using App”) location access. You can also turn on background notifications in Advanced Settings to be alerted when the app isn't on screen. And with CarPlay, it all runs on your car's display.
Which radar detectors work with it?
Uniden R4 / R4w, R8 / R8w, and R9, Valentine One Gen2, and Radenso DS1. See section 08 for pairing instructions.
My detector won't connect. What should I check?
Sometimes HighwayRadar's BT connection protocol doesn't play nice with other apps. If it can't find or connect to your detector, disconnect your detector from and close any other detector app that you're using, then try again. Once you're connected to HighwayRadar you should be able to reconnect to your other app(s).
What's the difference between an alert, the risk score, and the heat map?
An alert is a specific, current threat you're approaching (a reported officer, a camera, an aircraft, a radar signal). The heat map shows where enforcement tends to sit, based on history. The risk score turns that into how likely enforcement is on your exact stretch of road right now. Together: where to watch, and when to watch hardest.
I'm getting too many alerts. How do I calm it down?
A few options: switch Alert Mode to "Current Street" (section 07), turn off sounds for alert types you don't care about on their individual settings pages (like specific camera types, old police alerts, or aircraft), and if you use a detector, lean on the smart-muting options (section 08) to silence weak signals, low speeds, and known false alarms.
How do I report a police sighting?
Tap the report button on the main screen when you pass an officer and confirm. The app may also prompt you to confirm a report automatically at the right moment. Your report instantly warns drivers behind you, and it fades away on its own as it ages.
Does HighwayRadar track me or sell my data?
No! HighwayRadar/Blue Ridge Software Development does not track, collect, or sell any of your data. The app does transmit your location to the Google Maps API in order for the map to work, and Apple collects some anonymous information about your device and app usage. For exactly what's collected and how it's handled, see the Privacy Policy.
Is using this legal?
Rules vary by region. Radar detectors and certain alert features are restricted or prohibited in some places, and the local-law information in the app is for general awareness only, not legal advice. You're responsible for knowing and following the laws where you drive. See our Terms of Service.
Can I use it on CarPlay and/or iPad?
Yes to both. CarPlay puts your alerts and map on the car's screen; the iPad version uses the larger display to show more at once. See section 11.
How do I cancel my subscription and/or get a refund?
You can cancel your subscription by going to Settings → About → Manage Subscription. Apple manages all subscription payments, so you'll need to reach out to their customer support to request a refund.
Can I change my subscription type (e.g. individual to family)?
You can change your subscription type by going to Settings → About → Manage Subscription. If you're on an annual subscription, the change won't take effect until your current year is up. If that's a long way out, I recommend reaching out to Apple customer support (who handles subscription management) for assistance.
How to I share my family plan with my family members?
HighwayRadar uses iCloud Family Sharing for its family subscription. Once you've added your family members to your iCloud Family, they can simply download the app and tap "Restore Subscription" on the paywall to gain full access to the app.
Still stuck? Have feedback?
If something here didn't answer your question, I'm happy to help.
Contact the dev